<?xml version="1.0" encoding="utf-8"?><feed xmlns="http://www.w3.org/2005/Atom" ><generator uri="https://jekyllrb.com/" version="3.10.0">Jekyll</generator><link href="https://how-to-blog.gitlab.io/feed.xml" rel="self" type="application/atom+xml" /><link href="https://how-to-blog.gitlab.io/" rel="alternate" type="text/html" /><updated>2026-05-20T02:36:41+00:00</updated><id>https://how-to-blog.gitlab.io/feed.xml</id><title type="html">The Lean Ecommerce How-To</title><subtitle>Clear answers, practical fixes, and step-by-step guidance for ecommerce, SaaS, and tech operators.</subtitle><entry><title type="html">How to Turn One Product Brief Into Five Shopify Video Ads</title><link href="https://how-to-blog.gitlab.io/2026/05/19/how-to-turn-one-product-brief-into-five-shopify-video-ads/" rel="alternate" type="text/html" title="How to Turn One Product Brief Into Five Shopify Video Ads" /><published>2026-05-19T12:00:00+00:00</published><updated>2026-05-19T12:00:00+00:00</updated><id>https://how-to-blog.gitlab.io/2026/05/19/how-to-turn-one-product-brief-into-five-shopify-video-ads</id><content type="html" xml:base="https://how-to-blog.gitlab.io/2026/05/19/how-to-turn-one-product-brief-into-five-shopify-video-ads/"><![CDATA[<p>If you need more UGC-style creative without booking another shoot, the cleanest move is to start with one product brief and turn it into a few controlled variations. That is the point of <a href="https://supra-ugc-maker.sktch.io/">Supra UGC Maker</a>: choose an avatar, set a scene, write the script, pick the voice and tone, and generate reusable product videos for ads, product pages, email, launches, and social channels.</p>

<h2 id="what-youll-learn">What You’ll Learn</h2>

<ul>
  <li>How to turn one product into five ad angles without rebuilding everything</li>
  <li>Which parts of the video should stay the same</li>
  <li>Which parts you should swap to keep the creative fresh</li>
  <li>How to reuse the same project across ad, product page, email, and promo placements</li>
</ul>

<h2 id="1-write-one-brief-before-you-open-the-tool">1. Write One Brief Before You Open The Tool</h2>

<p>Start with the product, not the video. A good brief keeps the workflow focused and prevents you from making five versions that all say different things.</p>

<p>Write down these five items first:</p>

<ul>
  <li>Product name and one-sentence description</li>
  <li>Target shopper and the problem they care about</li>
  <li>One primary benefit you want the video to sell</li>
  <li>One proof point or detail that makes the offer believable</li>
  <li>One call to action</li>
</ul>

<p>
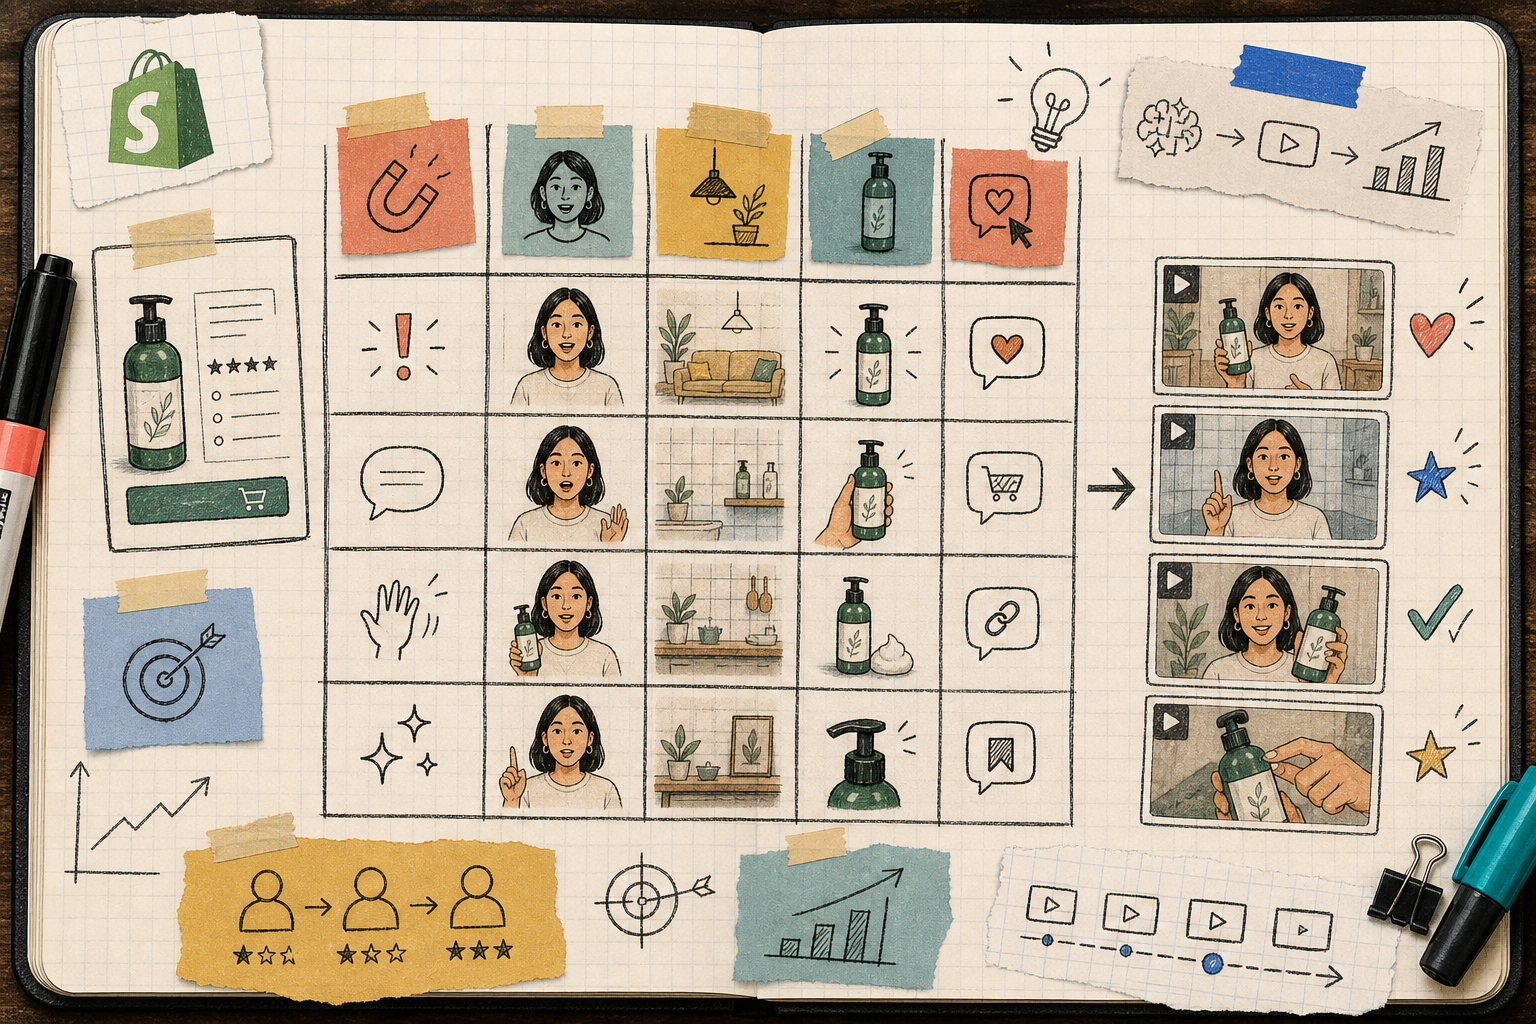
Then sketch five hooks from that brief. A practical set is:</p>

<ul>
  <li>Problem-first</li>
  <li>Outcome-first</li>
  <li>Comparison angle</li>
  <li>Seasonal angle</li>
  <li>FAQ or objection angle</li>
</ul>

<p>Keep the CTA simple. If the viewer is supposed to click through, the video should not try to do three different jobs at once.</p>

<h2 id="2-build-the-first-version-in-supra-ugc-maker">
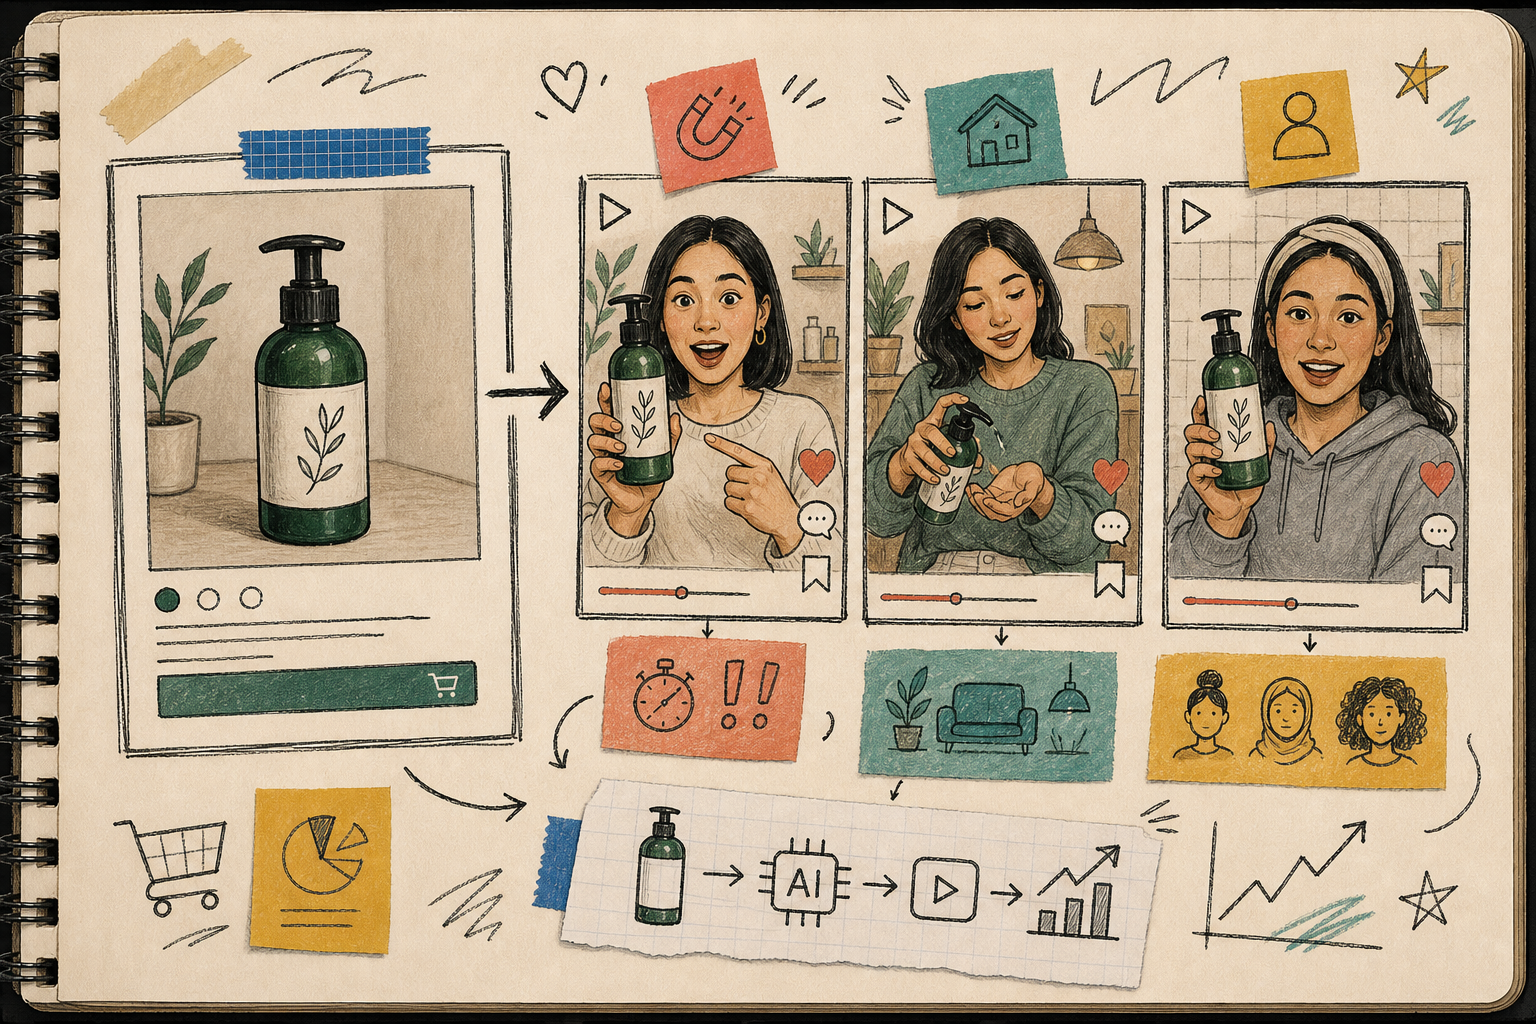
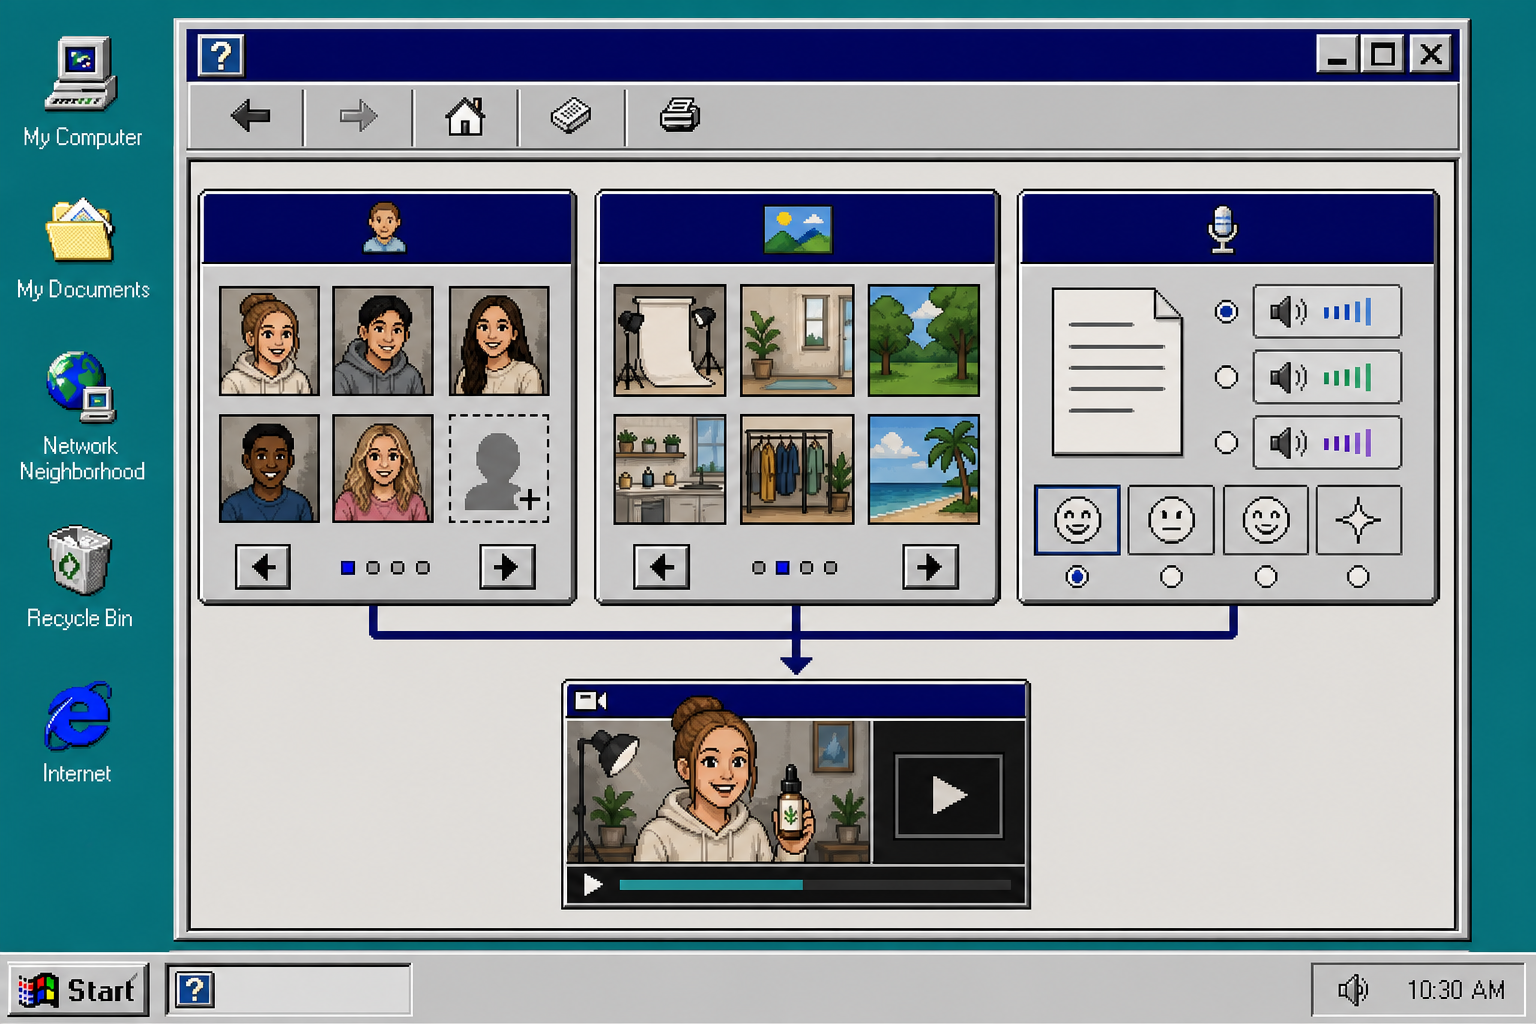
2. Build The First Version In Supra UGC Maker</h2>

<p>Open <a href="https://supra-ugc-maker.sktch.io/">Supra UGC Maker</a> and create the first project around the strongest hook.</p>

<p>Use the same core setup every time:</p>

<ul>
  <li>Choose a preset avatar or create a custom AI model</li>
  <li>Pick a scene that fits the brand, such as studio, outdoor, boutique, or a custom setting</li>
  <li>Add the Shopify product you want to feature</li>
  <li>Write the script in plain language</li>
  <li>Choose the voice and tone that matches the audience</li>
</ul>

<p><img src="/assets/img/posts/2026-05-19-how-to-turn-one-product-brief-into-five-shopify-video-ads/image-01-1498dbc2ea56.png" alt="Workflow matrix for avatar, scene, and voice choices" /></p>

<p>At this stage, the goal is not perfection. The goal is to get one version that clearly explains the product and feels like something a shopper would actually watch.</p>

<p>A helpful rule: keep the first version conservative. If the opening is too clever, you will not know whether the problem is the hook, the scene, the avatar, or the script.</p>

<h2 id="3-duplicate-the-project-and-change-one-variable-at-a-time">
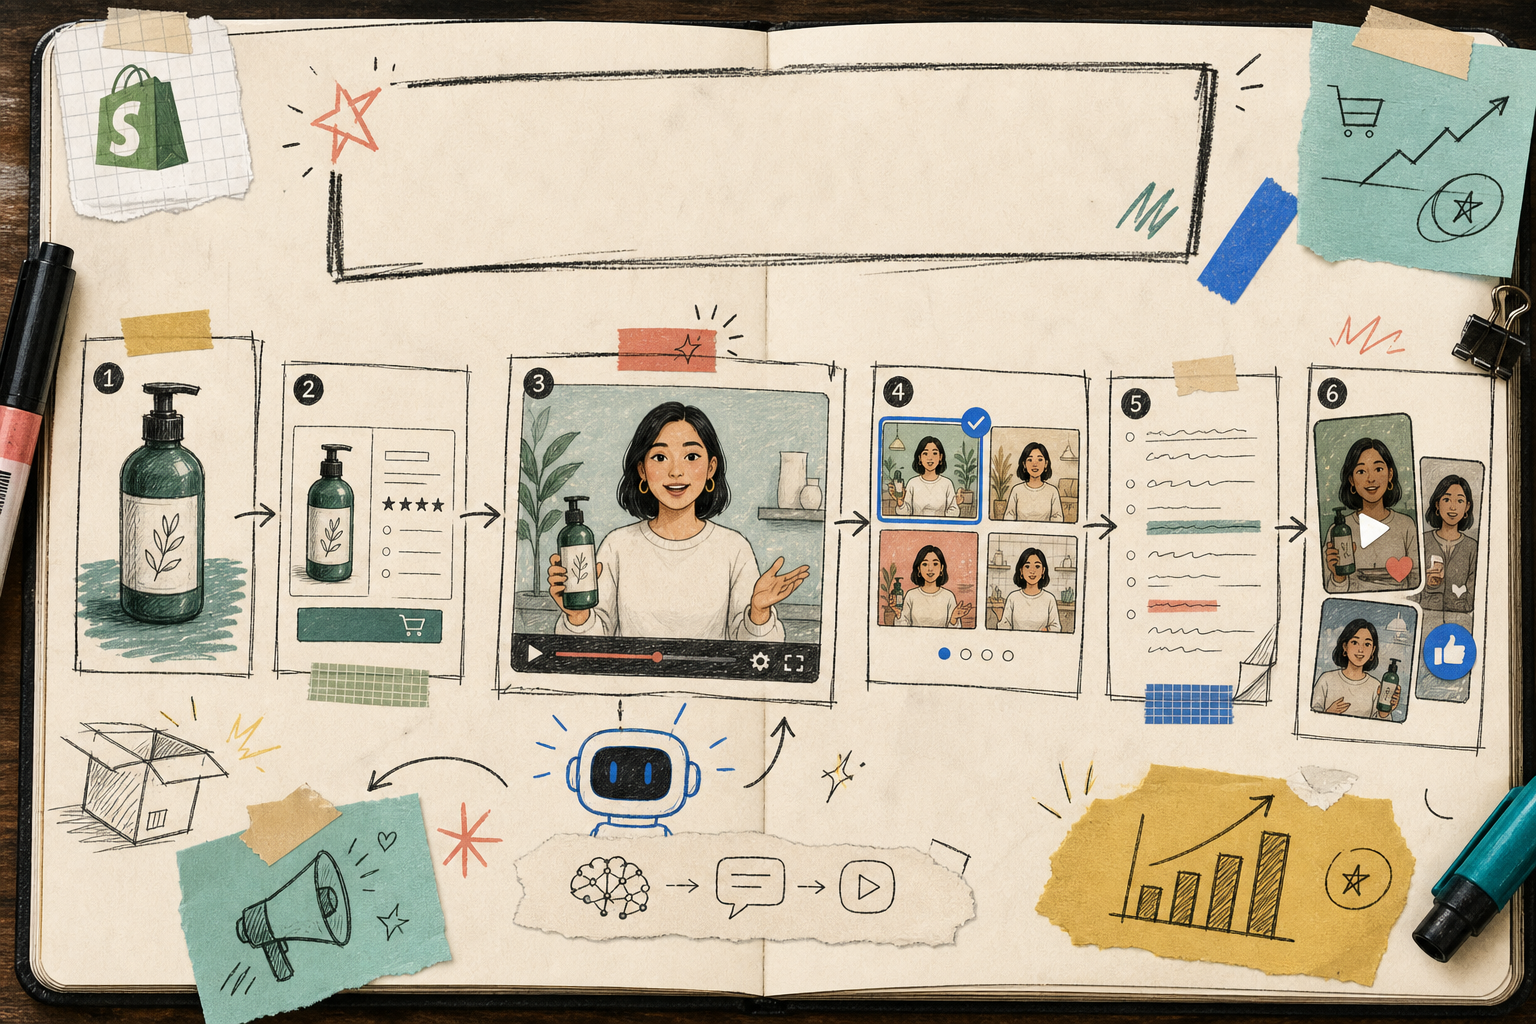
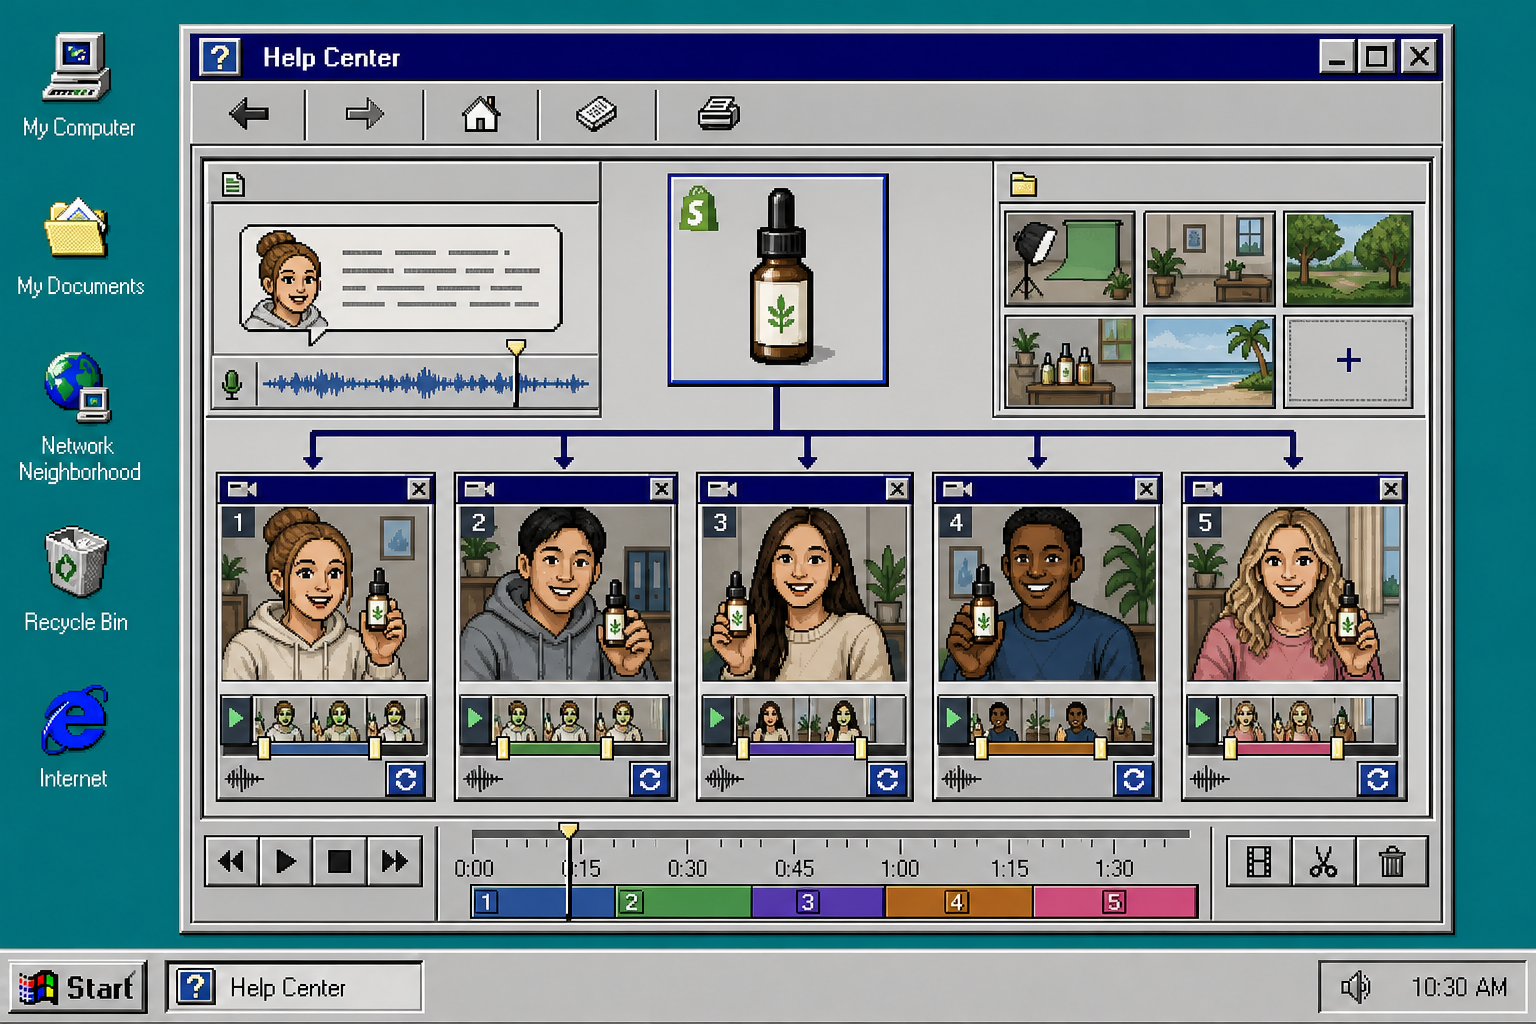
3. Duplicate The Project And Change One Variable At A Time</h2>

<p>Once the first video works, duplicate the project and make controlled edits. Do not rebuild from scratch unless the structure is broken.</p>

<p>Change one of these variables at a time:</p>

<ul>
  <li>The hook</li>
  <li>The avatar</li>
  <li>The scene</li>
  <li>The voice or tone</li>
  <li>The opening line</li>
</ul>

<p>Keep the product, the main claim, and the CTA steady so you can see what actually changed the result.</p>

<p>This is where the app’s project workflow matters. You can preview scenes before generating, reorder clips, trim the weak parts, update the script, and regenerate only what needs to change. That saves time and keeps the variations aligned instead of drifting into five unrelated videos.</p>

<p><img src="/assets/img/posts/2026-05-19-how-to-turn-one-product-brief-into-five-shopify-video-ads/image-02-e2de23a91f6e.png" alt="Timeline editor showing five UGC-style variations from one product" /></p>

<p>If you want five ads, build them as five controlled edits, not five separate experiments with no common baseline.</p>

<p>A simple pattern that works well is:</p>

<ol>
  <li>Version A: problem-first</li>
  <li>Version B: benefit-first</li>
  <li>Version C: comparison-first</li>
  <li>Version D: seasonal or promo-first</li>
  <li>Version E: FAQ or objection-first</li>
</ol>

<p>That gives you a clean testing set without making the production workflow messy.</p>

<h2 id="4-match-each-variation-to-a-placement">
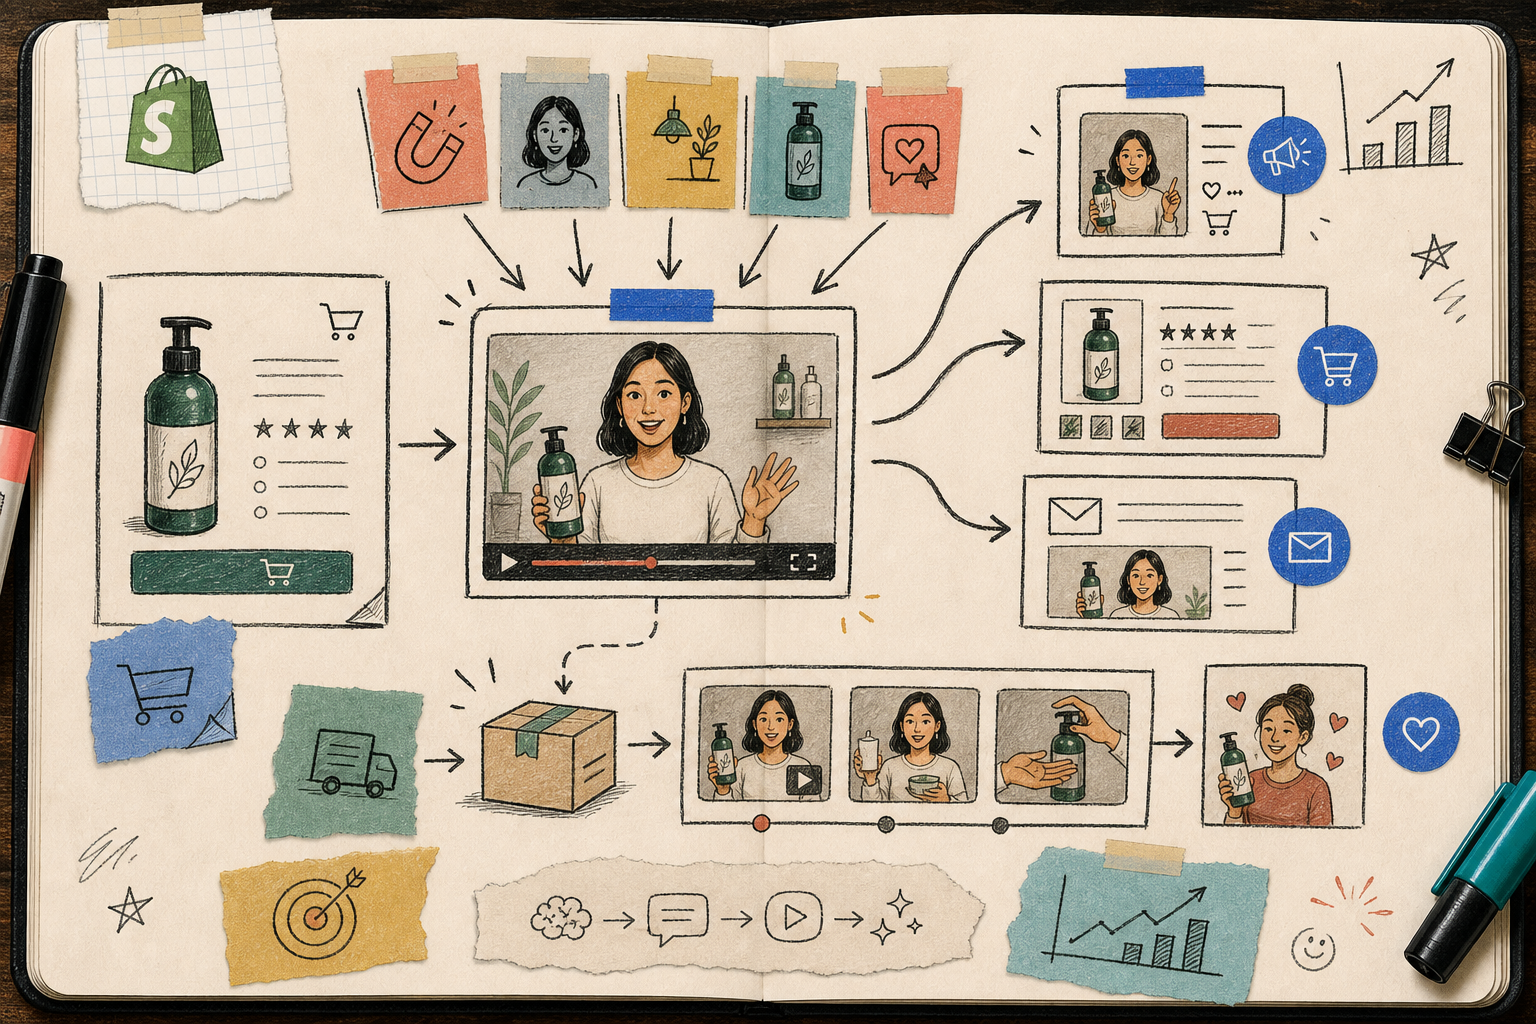
4. Match Each Variation To A Placement</h2>

<p>The same video can do different jobs if you plan for the placement early.</p>

<p>Use the strongest, fastest cut for ads. Keep the product and promise obvious in the first few seconds so the viewer does not have to wait for the point.</p>

<p>Use the clearest cut for the product page. This version should explain what the product is, not just what it feels like.</p>

<p>Use a tighter, more contextual version for email. Email traffic usually needs a little less hype and a little more clarity.</p>

<p>Use a themed version for seasonal promotions. That is where a scene change can carry a lot of the creative work.</p>

<p>Use an educational version for post-purchase help. This is a good place for a more calm tone and a clearer explanation.</p>

<p><img src="/assets/img/posts/2026-05-19-how-to-turn-one-product-brief-into-five-shopify-video-ads/image-03-b33fc2f1e290.png" alt="Where one Shopify UGC video can be reused across the funnel" /></p>

<p>
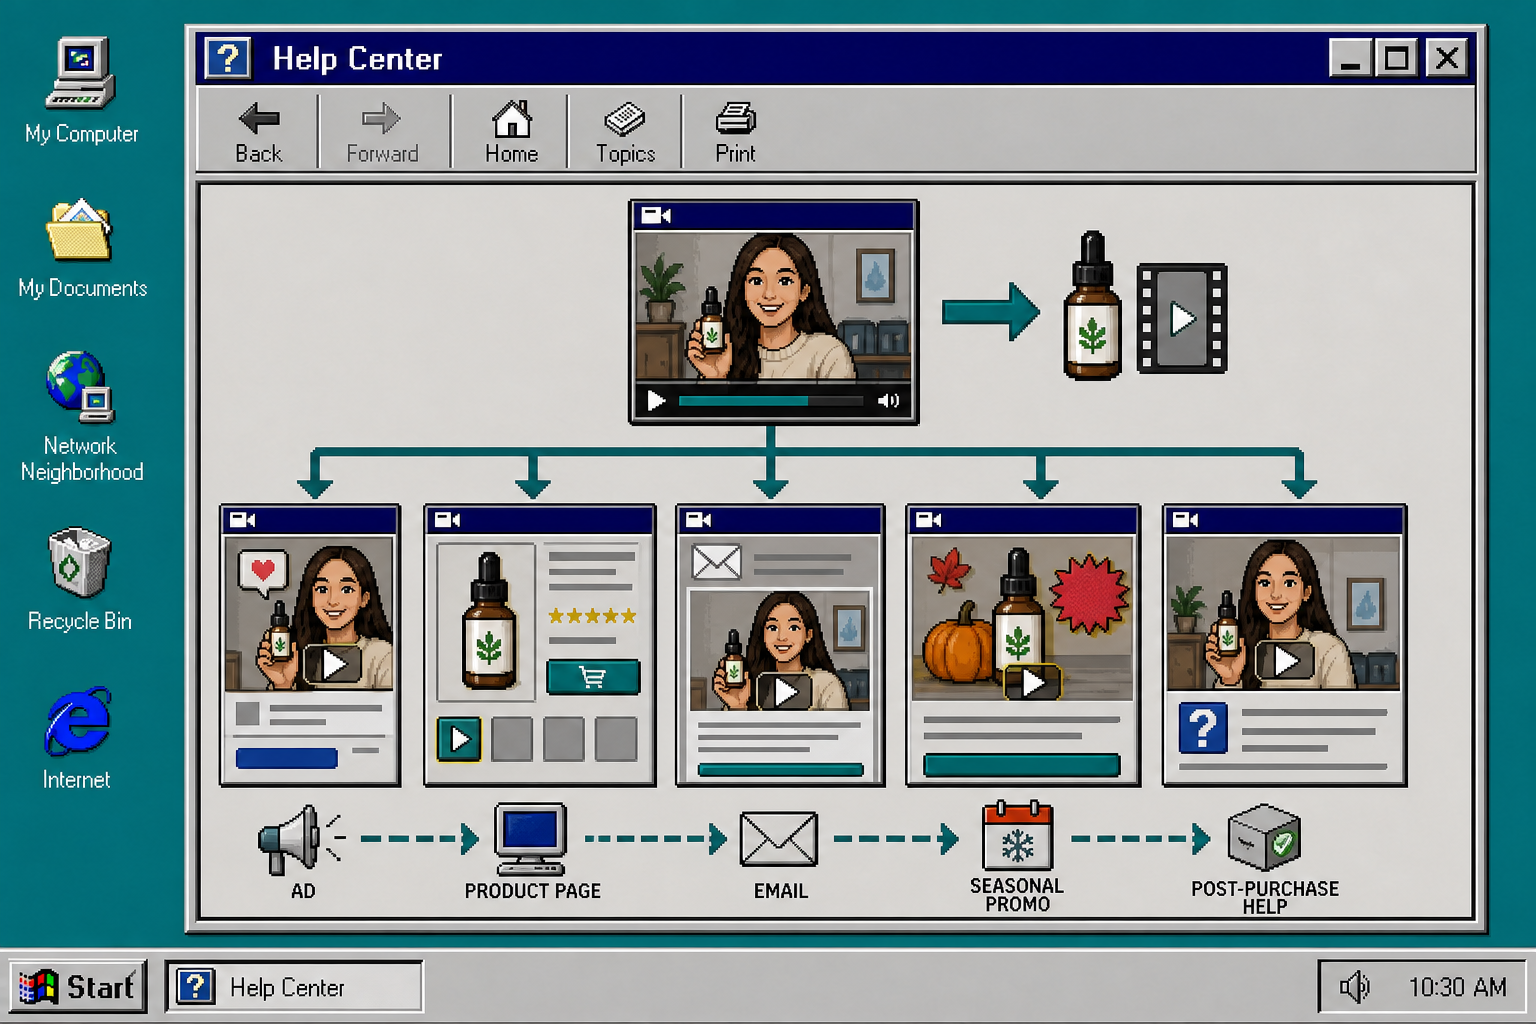
The important part is consistency. One product story can show up in several places, but each placement should get a cut that fits the job.</p>

<h2 id="5-keep-the-winners-and-cut-the-rest">5. Keep The Winners And Cut The Rest</h2>

<p>After you have five versions, keep the ones that do the job fastest.</p>

<p>If a version feels repetitive, change the scene or voice before you change the whole concept.</p>

<p>If the product is not obvious early enough, move it closer to the opening.</p>

<p>If the avatar feels wrong for the audience, switch to a different preset or build a custom AI model.</p>

<p>If the clip is too long, trim it down and keep the first few seconds that carry the message.</p>

<p>If one version works, save that scene and project structure so you can reuse it on the next product launch. The real win is not a single ad; it is a repeatable system for creating more Shopify product videos without starting over every time.</p>

<h2 id="troubleshooting">Troubleshooting</h2>

<h3 id="the-videos-all-feel-the-same">The videos all feel the same</h3>

<p>Change one visible element at a time. Start with the scene or the opening line. Do not swap everything at once or you will not know what mattered.</p>

<h3 id="the-product-is-not-clear-fast-enough">The product is not clear fast enough</h3>

<p>Bring the product forward in the first shot and shorten the intro. The viewer should understand what is being sold before the first major beat ends.</p>

<h3 id="the-avatar-does-not-fit-the-brand">The avatar does not fit the brand</h3>

<p>Try a different preset avatar or create a custom AI model that matches the audience better. A small change in casting can make the whole ad feel more believable.</p>

<h3 id="the-video-runs-too-long">The video runs too long</h3>

<p>Trim the weakest clips and keep the strongest claim. For ad creative, shorter is usually easier to test.</p>

<h3 id="i-need-more-creative-range">I need more creative range</h3>

<p>Start from five hooks, not five random edits. Hook variety gives you more meaningful test data than visual noise.</p>

<h2 id="related-guides">Related Guides</h2>

<ul>
  <li><a href="https://how-to-blog.gitlab.io/2026/05/19/how-to-turn-one-shopify-product-into-five-ugc-video-ads/">How to Turn One Shopify Product Into Five UGC Video Ads</a></li>
  <li><a href="https://the-lean-ecommerce.blogspot.com/2026/05/how-to-create-ugc-style-shopify-product.html">How to Create UGC-Style Shopify Product Videos Without a Shoot</a></li>
  <li><a href="https://how-to.the-lean-ecommerce.com/2026/05/19/how-to-create-studio-quality-shopify-product-photos-from-plain-shots/">How to Create Studio-Quality Shopify Product Photos From Plain Shots</a></li>
  <li><a href="https://the-lean-ecommerce.blogspot.com/2026/05/how-to-turn-product-data-into-mp4.html">How to Turn Product Data Into MP4 Videos with VideoFlow</a></li>
</ul>

<h2 id="next-step">Next Step</h2>

<p>If you want to test UGC-style creative without another shoot, start with one product, one avatar, one scene, and five hooks. Open <a href="https://supra-ugc-maker.sktch.io/">Supra UGC Maker</a>, use the free plan, and build the first five variations from the same project.</p>]]></content><author><name>The Lean Ecommerce</name></author><category term="how-to" /><category term="shopify" /><category term="ugc" /><category term="video-marketing" /><category term="ai-video" /><category term="ecommerce" /><summary type="html"><![CDATA[Turn one product brief into five UGC-style Shopify video ads with avatars, scenes, scripts, and reusable projects.]]></summary><media:thumbnail xmlns:media="http://search.yahoo.com/mrss/" url="https://how-to-blog.gitlab.io/assets/img/posts/2026-05-19-how-to-turn-one-product-brief-into-five-shopify-video-ads/cover-e0bbd15014ea.png" /><media:content medium="image" url="https://how-to-blog.gitlab.io/assets/img/posts/2026-05-19-how-to-turn-one-product-brief-into-five-shopify-video-ads/cover-e0bbd15014ea.png" xmlns:media="http://search.yahoo.com/mrss/" /></entry><entry><title type="html">How to Turn One Shopify Product Into Five UGC Video Ads</title><link href="https://how-to-blog.gitlab.io/2026/05/19/how-to-turn-one-shopify-product-into-five-ugc-video-ads/" rel="alternate" type="text/html" title="How to Turn One Shopify Product Into Five UGC Video Ads" /><published>2026-05-19T06:39:13+00:00</published><updated>2026-05-19T06:39:13+00:00</updated><id>https://how-to-blog.gitlab.io/2026/05/19/how-to-turn-one-shopify-product-into-five-ugc-video-ads</id><content type="html" xml:base="https://how-to-blog.gitlab.io/2026/05/19/how-to-turn-one-shopify-product-into-five-ugc-video-ads/"><![CDATA[<h1 id="how-to-turn-one-shopify-product-into-five-ugc-video-ads">How to Turn One Shopify Product Into Five UGC Video Ads</h1>

<p>I keep seeing the same problem in Shopify stores: there is one good product, one decent asset folder, and a lot of pressure to make more video. The quickest fix I have found is not a bigger shoot. It is a smaller system.</p>

<p><a href="https://supra-ugc-maker.sktch.io/">Supra UGC Maker</a> is the tool I would use when I need UGC-style product videos with AI avatars, scenes, scripts, speech, and product references. It gives me a way to build one base concept and then branch it into multiple ad angles without hiring influencers, videographers, or editors every time I want a new variation.</p>

<p><img src="/assets/img/posts/2026-05-19-how-to-turn-one-shopify-product-into-five-ugc-video-ads/image-01-13eaa6eea0c9.png" alt="Hand-drawn Shopify UGC video banner" /></p>

<h2 id="start-with-the-decision-not-the-footage">Start With The Decision, Not The Footage</h2>

<p>Before I generate anything, I try to answer one simple question: what do I want the shopper to believe after 10 seconds?</p>

<p>That question is the whole game. If I cannot answer it, the video turns into generic product noise. If I can answer it, the rest gets much easier.</p>

<p>For a single Shopify product, I usually want to lock these things first:</p>

<ul>
  <li>The promise: what problem the product solves.</li>
  <li>The viewer: who should feel seen by the script.</li>
  <li>The scene: what setting makes the product feel believable.</li>
  <li>The voice: whether the delivery should feel calm, energetic, direct, or conversational.</li>
  <li>The CTA: what I want the viewer to do next.</li>
</ul>

<p>That is where Supra UGC Maker helps. I can choose a preset avatar or create a custom AI model, pick a scene, add the product, write the script, and then generate a video that feels specific instead of assembled from random ecommerce stock.</p>

<p><img src="/assets/img/posts/2026-05-19-how-to-turn-one-shopify-product-into-five-ugc-video-ads/image-02-4ea3b3386ea2.png" alt="Creative testing matrix for Shopify UGC ads" /></p>

<h2 id="the-five-variations-i-would-build-from-one-product">The Five Variations I Would Build From One Product</h2>

<p>If I only had time to make five clips, I would make these.</p>

<h3 id="1-the-problem-hook">1. The Problem Hook</h3>

<p>Start with the annoyance or friction the buyer already feels. This version is for people who have not decided they need the product yet, but know they are tired of the old way.</p>

<p>Keep the first line blunt and practical. A UGC-style video works best here when it sounds like someone explaining why they switched, not like a brand announcing a launch.</p>

<h3 id="2-the-product-walkthrough">2. The Product Walkthrough</h3>

<p>This is the most straightforward ad variation. The avatar introduces the product, shows it in context, and explains what makes it useful.</p>

<p>I like this version because it usually does double duty: it can run as a paid ad and also live on a product page or landing page. If a shopper is already warm, the walkthrough gives them enough clarity to act.</p>

<h3 id="3-the-comparison-angle">3. The Comparison Angle</h3>

<p>This version is for the shopper who is still comparing options. The script should contrast the product with the manual, slower, or messier alternative.</p>

<p>That comparison does not have to be dramatic. It just has to be clear enough that the buyer understands why this product exists.</p>

<h3 id="4-the-social-proof-angle">4. The Social Proof Angle</h3>

<p>Not every product needs a testimonial, but most products benefit from the feeling of one. A short AI avatar clip can simulate a casual recommendation, a reaction, or a quick “this is why I kept using it” moment.</p>

<p>The key is not to overplay authenticity. I treat this as a scalable UGC-style creative, not a replacement for a real creator when a real creator is the better fit.</p>

<h3 id="5-the-seasonal-or-offer-angle">5. The Seasonal Or Offer Angle</h3>

<p>This is the version I would keep ready for launches, promos, or deadline-based campaigns.</p>

<p>It is the easiest clip to refresh because the product can stay the same while the hook, tone, and CTA shift with the calendar. That makes it useful for testing ads without rebuilding the entire project.</p>

<h2 id="the-small-rules-that-keep-the-videos-usable">The Small Rules That Keep The Videos Usable</h2>

<p>The line between useful and fake is usually pretty thin. These are the rules I would keep on my desk.</p>

<ul>
  <li>Keep the script short. A UGC-style ad should get to the point fast.</li>
  <li>Match the scene to the product. A good setting makes the product feel like it belongs there.</li>
  <li>Use the product reference deliberately. The viewer should know what is being sold without guessing.</li>
  <li>Review the preview before you generate the final clip. That is easier than trying to rescue a weak concept after the fact.</li>
  <li>Reorder, trim, update, and regenerate clips inside the same project instead of rebuilding from scratch.</li>
  <li>Save the good scenes and projects so the next variation starts from something proven.</li>
</ul>

<p>That last part matters more than people think. The best workflow is not “make one video.” It is “keep one project alive and keep branching it.”</p>

<p><img src="/assets/img/posts/2026-05-19-how-to-turn-one-shopify-product-into-five-ugc-video-ads/image-03-7e50c66e7c08.png" alt="One Shopify product turned into multiple UGC-style video ads" /></p>

<h2 id="where-i-would-use-the-videos-in-a-shopify-funnel">Where I Would Use The Videos In A Shopify Funnel</h2>

<p>Once the first batch is done, I would not treat the clips like isolated assets. I would place them where they can do work.</p>

<ul>
  <li>Paid social ads for TikTok, Instagram Reels, and Facebook.</li>
  <li>Product pages where the buyer needs more context than images alone can give.</li>
  <li>Launch emails that need a quick visual hook.</li>
  <li>Seasonal promotions that need a faster refresh than a photo shoot can provide.</li>
  <li>Post-purchase education when the product needs a little explanation.</li>
</ul>

<p>That is the real upside of an AI UGC video generator: it gives a Shopify store enough short-form creative to support multiple parts of the funnel without starting from zero every time.</p>

<p><img src="/assets/img/posts/2026-05-19-how-to-turn-one-shopify-product-into-five-ugc-video-ads/image-04-03146a5f0fa4.png" alt="UGC video funnel across product, ad, email, and post-purchase" /></p>

<h2 id="where-this-approach-stops">Where This Approach Stops</h2>

<p>I would not use AI UGC as a universal answer.</p>

<p>It is strong when the goal is scalable creative testing, product explainers, and fast campaign production. It is weaker when you need a real creator’s community trust, a lived-in testimonial, or a personal story that only a human can tell well.</p>

<p>That distinction is useful because it keeps the tool in the right lane. Supra UGC Maker is good when you need more product videos, more variants, and less manual production drag.</p>

<h2 id="related-reads">Related Reads</h2>

<ul>
  <li><a href="https://the-lean-ecommerce.blogspot.com/2026/05/how-to-create-ugc-style-shopify-product.html">How to Create UGC-Style Shopify Product Videos Without a Shoot</a></li>
  <li><a href="https://the-lean-ecommerce.blogspot.com/2026/05/how-to-turn-product-data-into-mp4.html">How to Turn Product Data Into MP4 Videos with VideoFlow</a></li>
  <li><a href="https://the-lean-ecommerce.github.io/2026/05/18/how-to-build-a-product-aware-shopify-blog-workflow-that-publishes-on-s/">How to Build a Product-Aware Shopify Blog Workflow That Publishes on Schedule</a></li>
  <li><a href="https://productivity-tech-business.blogspot.com/2026/05/how-to-keep-a-shopify-blog-publishing-without-generic-ai-drafts.html">How to Keep a Shopify Blog Publishing Without Generic AI Drafts</a></li>
</ul>

<h2 id="conclusion">Conclusion</h2>

<p>If you want a practical way to make more Shopify video ads without turning every new idea into a full production cycle, start with one product, one avatar, one scene, and five hook variations.</p>

<p>That is enough to see whether the workflow is useful. If it is, the next step is simple: open Supra UGC Maker, build the first reusable project, and try the free plan on your strongest product first.</p>]]></content><author><name>The Lean Ecommerce</name></author><category term="how-to" /><category term="supra-ugc-maker" /><category term="shopify" /><category term="ugc" /><category term="ai-video" /><category term="product-video" /><category term="ecommerce-marketing" /><summary type="html"><![CDATA[Use Supra UGC Maker to turn one Shopify product into multiple UGC-style video ads with avatars, scenes, scripts, and product references.]]></summary><media:thumbnail xmlns:media="http://search.yahoo.com/mrss/" url="https://how-to-blog.gitlab.io/assets/img/posts/2026-05-19-how-to-turn-one-shopify-product-into-five-ugc-video-ads/cover-13eaa6eea0c9.png" /><media:content medium="image" url="https://how-to-blog.gitlab.io/assets/img/posts/2026-05-19-how-to-turn-one-shopify-product-into-five-ugc-video-ads/cover-13eaa6eea0c9.png" xmlns:media="http://search.yahoo.com/mrss/" /></entry><entry><title type="html">How to Sync Notion Pages to Webflow CMS Step by Step</title><link href="https://how-to-blog.gitlab.io/2026/05/17/how-to-sync-notion-pages-to-webflow-cms-step-by-step/" rel="alternate" type="text/html" title="How to Sync Notion Pages to Webflow CMS Step by Step" /><published>2026-05-17T22:31:34+00:00</published><updated>2026-05-17T22:31:34+00:00</updated><id>https://how-to-blog.gitlab.io/2026/05/17/how-to-sync-notion-pages-to-webflow-cms-step-by-step</id><content type="html" xml:base="https://how-to-blog.gitlab.io/2026/05/17/how-to-sync-notion-pages-to-webflow-cms-step-by-step/"><![CDATA[<p>You can move published notes from Notion into Webflow CMS without rebuilding the page by hand. Syncflow is the simple way to write in Notion, map the fields once, and keep the Webflow collection aligned as the content changes.</p>

<p>If you are setting it up for the first time, start with one Notion database, one Webflow collection, and one test page. That keeps the first sync readable and makes it obvious when a field mapping needs work.</p>

<h2 id="1-connect-notion-and-webflow">1. Connect Notion And Webflow</h2>

<p>Open Syncflow, connect both accounts, and choose the Notion database and Webflow collection that should stay in sync. Use a single article for the first test instead of importing a whole content backlog.</p>

<p>You should see the app confirm that both sides are connected before you move on.</p>

<p><img src="/assets/img/posts/2026-05-17-how-to-sync-notion-pages-to-webflow-cms-step-by-step/image-01-ceee70baf239.png" alt="Connect Notion fields with Webflow fields" /></p>

<h2 id="2-map-each-field-before-you-sync-anything">2. Map Each Field Before You Sync Anything</h2>

<p>Match the source and destination fields one by one. The useful pairs are usually obvious:</p>

<ul>
  <li>Title to name or heading.</li>
  <li>Summary to excerpt.</li>
  <li>Hero image to cover image.</li>
  <li>Category to collection tag or reference field.</li>
  <li>Published date to the live date field.</li>
</ul>

<p>Do not guess at a field just because it sounds close. If the source and destination mean different things, the sync will technically work and still produce a bad page.</p>

<p>You should see a clean field map with no ambiguous leftovers before you save.</p>

<p><img src="/assets/img/posts/2026-05-17-how-to-sync-notion-pages-to-webflow-cms-step-by-step/image-02-06c2e1cab6f0.png" alt="Retro field mapping illustration" /></p>

<h2 id="3-pick-auto-sync-or-manual-sync">3. Pick Auto-Sync Or Manual Sync</h2>

<p>If you publish often, turn on auto-sync so new or edited Notion pages flow into Webflow without another round of copy-paste. If the article needs approval, keep the sync manual or leave the item as a draft first.</p>

<p>The product brief supports either approach, which is the practical part. You can use Syncflow for a one-off import or build a recurring workflow around it.</p>

<p>You should see the sync mode clearly labeled before the first live update.</p>

<p><img src="/assets/img/posts/2026-05-17-how-to-sync-notion-pages-to-webflow-cms-step-by-step/image-03-c4a4b45c2381.png" alt="Customize Sync Settings" /></p>

<h2 id="4-verify-the-imported-page-in-webflow">4. Verify The Imported Page In Webflow</h2>

<p>Run one test sync and inspect the CMS item inside Webflow. Check the body text, headings, links, and any images or nested content blocks. If the page is meant to match a Notion article closely, the destination template should preserve the structure you care about.</p>

<p>This is the step that catches most problems early. A missing field here is easier to fix before the article becomes part of a live content system.</p>

<h2 id="5-decide-when-to-publish-automatically">5. Decide When To Publish Automatically</h2>

<p>Once the first sync looks right, choose whether the Webflow item should publish immediately or sit in draft state for review. Draft review is the safer default for brand-sensitive pages, seasonal content, and anything with product claims.</p>

<p>If you are building a larger content pipeline, keep the first version boring and predictable. Get one article syncing cleanly, then expand to the rest of the database after you know the mapping is stable.</p>

<h2 id="troubleshooting">Troubleshooting</h2>

<p>If a sync looks wrong, start with the field map.</p>

<ul>
  <li>Missing text usually means the Notion property was not connected to the right Webflow field.</li>
  <li>Missing images usually mean the image field was not mapped or the source asset is not available the way Webflow expects.</li>
  <li>Broken links usually mean the destination field is not set up for rich text or URL content.</li>
  <li>Duplicate content usually means the same page was synced more than once without a clear unique key.</li>
  <li>Layout drift usually means the Webflow template is not shaped to match the imported blocks.</li>
</ul>

<p>If the setup still feels off, test one page at a time until the mapping is boringly reliable.</p>

<h2 id="related-reads">Related Reads</h2>

<p>If you are comparing adjacent Webflow workflows, these recent posts are useful:</p>

<ul>
  <li><a href="https://the-lean-ecommerce.blogspot.com/2026/05/how-to-export-webflow-site-to-static.html">How to Export a Webflow Site to Static HTML with ExFlow</a></li>
  <li><a href="https://the-lean-ecommerce.blogspot.com/2026/05/how-to-download-webflow-site-and-host.html">How to Download a Webflow Site and Host It Yourself with ExFlow</a></li>
  <li><a href="https://how-to-blog.gitlab.io/2026/05/17/how-to-export-a-framer-site-and-host-it-yourself-with-exflow/">How to Export a Framer Site and Host It Yourself with ExFlow</a></li>
  <li><a href="https://how-to-blog.gitlab.io/2026/05/16/how-to-keep-a-shopify-blog-publishing-without-generic-ai-drafts/">How to Keep a Shopify Blog Publishing Without Generic AI Drafts</a></li>
</ul>

<h2 id="conclusion">Conclusion</h2>

<p>If you already write in Notion and publish in Webflow, Syncflow gives you a cleaner path from draft to CMS item. Set the fields once, test one article, and keep the rest of the collection in sync from there.</p>

<p>If you want a simpler content pipeline, start with the Syncflow landing page at https://syncflow.ybouane.com/ and run one controlled test import before you automate the rest of the database.</p>]]></content><author><name>The Lean Ecommerce</name></author><category term="how-to" /><category term="notion" /><category term="webflow" /><category term="cms" /><category term="syncflow" /><category term="automation" /><category term="how-to" /><summary type="html"><![CDATA[Sync Notion pages to Webflow CMS with field mapping, auto-sync, and a review-first workflow using Syncflow.]]></summary><media:thumbnail xmlns:media="http://search.yahoo.com/mrss/" url="https://how-to-blog.gitlab.io/assets/img/posts/2026-05-17-how-to-sync-notion-pages-to-webflow-cms-step-by-step/cover-a5e2c8d43175.png" /><media:content medium="image" url="https://how-to-blog.gitlab.io/assets/img/posts/2026-05-17-how-to-sync-notion-pages-to-webflow-cms-step-by-step/cover-a5e2c8d43175.png" xmlns:media="http://search.yahoo.com/mrss/" /></entry><entry><title type="html">How to Export a Framer Site and Host It Yourself with ExFlow</title><link href="https://how-to-blog.gitlab.io/2026/05/17/how-to-export-a-framer-site-and-host-it-yourself-with-exflow/" rel="alternate" type="text/html" title="How to Export a Framer Site and Host It Yourself with ExFlow" /><published>2026-05-17T12:00:00+00:00</published><updated>2026-05-17T12:00:00+00:00</updated><id>https://how-to-blog.gitlab.io/2026/05/17/how-to-export-a-framer-site-and-host-it-yourself-with-exflow</id><content type="html" xml:base="https://how-to-blog.gitlab.io/2026/05/17/how-to-export-a-framer-site-and-host-it-yourself-with-exflow/"><![CDATA[<p>You can export a Framer site, keep the static files, and host them somewhere you control. If you need a plain HTML/CSS/JS copy of a Framer project, ExFlow is built for that job.</p>

<p>This guide shows the basics: what to export, what to check before you publish, and how to avoid the common mistakes that leave files missing or pages broken.</p>

<p><img src="/assets/img/posts/2026-05-17-how-to-export-a-framer-site-and-host-it-yourself-with-exflow/image-01-b367cce3ec2c.png" alt="Framer export configuration" /></p>

<h2 id="1-decide-what-you-need-from-the-export">1. Decide What You Need From The Export</h2>

<p>Start with the real goal. If you only need a static copy for hosting, you usually want the full site export, not a partial download.</p>

<p>Use ExFlow when you want to:</p>

<ul>
  <li>Download a Framer site by URL.</li>
  <li>Export HTML pages with CSS, JavaScript, images, and media.</li>
  <li>Remove the “Made with Framer” badge.</li>
  <li>Add custom <code class="language-plaintext highlighter-rouge">script.js</code> or <code class="language-plaintext highlighter-rouge">style.css</code> files.</li>
  <li>Sync the result to Git, S3, or FTP.</li>
</ul>

<p>If your site depends on a specific animation, interactive block, or asset, check that it is still present after export. Static export is only useful if the output matches the parts of the site you care about.</p>

<h2 id="2-enter-the-framer-url-in-exflow">2. Enter The Framer URL In ExFlow</h2>

<p>Open ExFlow.site and paste the Framer site URL into the URL field. Keep the address exact. If the site has a custom domain, use the live public URL you want to export.</p>

<p>When the export is ready, you should see files for the site pages and assets instead of a single page snapshot. That is the point where the export becomes reusable on another host.</p>

<p><img src="/assets/img/posts/2026-05-17-how-to-export-a-framer-site-and-host-it-yourself-with-exflow/image-02-297f27828c2a.png" alt="Framer export workflow diagram" /></p>

<h2 id="3-choose-the-export-settings-carefully">3. Choose The Export Settings Carefully</h2>

<p>For most Framer exports, the safest setup is the one that keeps the site complete and easy to serve later.</p>

<p>Check these settings first:</p>

<ol>
  <li>Export CSS files.</li>
  <li>Export JS files.</li>
  <li>Export images and media files.</li>
  <li>Export all pages.</li>
  <li>Keep the <code class="language-plaintext highlighter-rouge">.html</code> extension on exported pages.</li>
  <li>Remove the Framer badge if you need a cleaner public copy.</li>
</ol>

<p>If you plan to make small edits after export, add your own <code class="language-plaintext highlighter-rouge">style.css</code> or <code class="language-plaintext highlighter-rouge">script.js</code> files before you host the site. That keeps custom changes separate from the generated files.</p>

<h2 id="4-export-the-site-and-check-the-output">4. Export The Site And Check The Output</h2>

<p>Run the export and inspect the result before you publish anything.</p>

<p>Look for these things:</p>

<ul>
  <li>Each page has the correct name and extension.</li>
  <li>Images and media files are present in the output.</li>
  <li>CSS and JS files are included where expected.</li>
  <li>The homepage opens correctly from the exported folder.</li>
  <li>Internal links still point to the right pages.</li>
</ul>

<p>If the site is large, treat the first export as a verification pass. You want to catch missing assets before you connect the folder to GitLab Pages or another host.</p>

<p><img src="/assets/img/posts/2026-05-17-how-to-export-a-framer-site-and-host-it-yourself-with-exflow/image-03-3b623ce050ed.png" alt="Framer export progress illustration" /></p>

<h2 id="5-host-the-static-files-somewhere-you-control">5. Host The Static Files Somewhere You Control</h2>

<p>Once the export is clean, move the files to your host of choice. ExFlow supports Git, S3, FTP, and hosting on its own servers, so you can match the workflow to the way you already deploy sites.</p>

<p>A simple GitLab Pages path looks like this:</p>

<ol>
  <li>Sync the exported files to a Git repository.</li>
  <li>Push the repo to GitLab.</li>
  <li>Configure the Pages job or static site setup.</li>
  <li>Confirm the published URL loads the exported homepage.</li>
</ol>

<p>If you are replacing a Framer-hosted site, this is the point where you verify your custom domain, navigation, and asset paths one more time. Static hosting is simple, but only if the export is complete.</p>

<h2 id="troubleshooting">Troubleshooting</h2>

<p>If the export looks wrong, start here:</p>

<ul>
  <li>Missing images usually mean the asset export settings were too narrow.</li>
  <li>Broken links usually mean a page was not included in the export.</li>
  <li>Missing styles usually mean CSS files were not exported or were moved after the fact.</li>
  <li>A blank or partial page usually means the browser is loading the wrong file path.</li>
  <li>A custom script that worked in Framer may need to be adjusted after export.</li>
</ul>

<p>When in doubt, compare the exported folder to the live site page by page. That is faster than guessing which setting caused the problem.</p>

<h2 id="related-guides">Related Guides</h2>

<p>If you are comparing Framer to other export workflows, these ExFlow guides are useful:</p>

<ul>
  <li><a href="https://the-lean-ecommerce.blogspot.com/2026/05/how-to-download-webflow-site-and-host.html">How to Download a Webflow Site and Host It Yourself with ExFlow</a></li>
  <li><a href="https://the-lean-ecommerce.blogspot.com/2026/05/how-to-export-webflow-site-to-static.html">How to Export a Webflow Site to Static HTML with ExFlow</a></li>
</ul>

<h2 id="conclusion">Conclusion</h2>

<p>A Framer export only becomes useful when the static files are complete and easy to host. ExFlow gives you a direct path from live Framer URL to downloadable site files, then to Git, S3, FTP, or hosted deployment.</p>

<p>If you want a self-hosted Framer copy, export the site, verify the assets, and publish the static folder next.</p>]]></content><author><name>The Lean Ecommerce</name></author><category term="how-to" /><category term="framer" /><category term="exflow" /><category term="hosting" /><category term="gitlab-pages" /><category term="static-site" /><summary type="html"><![CDATA[Export a Framer site to static files, host it yourself, and keep the workflow simple with ExFlow.]]></summary><media:thumbnail xmlns:media="http://search.yahoo.com/mrss/" url="https://how-to-blog.gitlab.io/assets/img/posts/2026-05-17-how-to-export-a-framer-site-and-host-it-yourself-with-exflow/cover-297f27828c2a.png" /><media:content medium="image" url="https://how-to-blog.gitlab.io/assets/img/posts/2026-05-17-how-to-export-a-framer-site-and-host-it-yourself-with-exflow/cover-297f27828c2a.png" xmlns:media="http://search.yahoo.com/mrss/" /></entry><entry><title type="html">How to Keep a Shopify Blog Publishing Without Generic AI Drafts</title><link href="https://how-to-blog.gitlab.io/2026/05/16/how-to-keep-a-shopify-blog-publishing-without-generic-ai-drafts/" rel="alternate" type="text/html" title="How to Keep a Shopify Blog Publishing Without Generic AI Drafts" /><published>2026-05-16T15:48:46+00:00</published><updated>2026-05-16T15:48:46+00:00</updated><id>https://how-to-blog.gitlab.io/2026/05/16/how-to-keep-a-shopify-blog-publishing-without-generic-ai-drafts</id><content type="html" xml:base="https://how-to-blog.gitlab.io/2026/05/16/how-to-keep-a-shopify-blog-publishing-without-generic-ai-drafts/"><![CDATA[<h1 id="how-to-keep-a-shopify-blog-publishing-without-generic-ai-drafts">How to Keep a Shopify Blog Publishing Without Generic AI Drafts</h1>

<p><img src="/assets/img/posts/2026-05-16-how-to-keep-a-shopify-blog-publishing-without-generic-ai-drafts/image-01-137f14cbfad6.png" alt="Shopify blog automation banner" /></p>

<p>Most Shopify stores do not struggle with the idea of blogging. They struggle with the rhythm of it.</p>

<p>You publish a useful article, traffic looks promising, and then the calendar slips. The next post takes too long, the topic feels vague, or the draft reads like every other AI-generated article on the internet. That is exactly where Supra Blog Automation fits: it helps merchants generate, schedule, and publish SEO-focused posts with product context, internal links, and image options built into the workflow.</p>

<p>The goal is not to replace editorial judgment. It is to remove the repetitive work that stops good stores from posting consistently.</p>

<h2 id="why-generic-ai-drafts-usually-miss-the-mark">Why Generic AI Drafts Usually Miss The Mark</h2>

<p>Generic AI posts tend to fail in the same ways:</p>

<ul>
  <li>They explain the topic broadly but do not help a merchant sell anything.</li>
  <li>They ignore real products, collections, and shopping intent.</li>
  <li>They overuse shallow filler sections that look polished but say little.</li>
  <li>They rarely support internal linking or a repeatable content plan.</li>
</ul>

<p>That is a problem for ecommerce SEO because a blog post should do more than attract traffic. It should help readers move from a search query to a product page, a collection, or a purchase decision.</p>

<p><img src="/assets/img/posts/2026-05-16-how-to-keep-a-shopify-blog-publishing-without-generic-ai-drafts/image-02-54be8cd214e8.png" alt="Product-aware content illustration" /></p>

<p>Supra Blog Automation is designed around that reality. The app can generate a full post from a topic, goal, tone, and product context, which makes it much easier to write something that feels connected to the store instead of a detached internet summary.</p>

<h2 id="build-the-blog-around-a-real-workflow">Build The Blog Around A Real Workflow</h2>

<p>The cleanest way to use the app is to think in terms of workflow, not one-off content.</p>

<ol>
  <li>Pick a topic with search intent.</li>
  <li>Add the product or collection you want to support.</li>
  <li>Set the tone and post goal.</li>
  <li>Decide whether the article should publish immediately or save as a draft.</li>
  <li>Review the output, then repeat the process on a schedule.</li>
</ol>

<p>That structure matters because it gives you control over consistency. A monthly cadence is often enough for smaller stores. Larger catalogs may need weekly or even more frequent publishing, especially if the content plan includes buying guides, seasonal pages, or product education posts.</p>

<h2 id="use-recurring-automations-to-stay-consistent">Use Recurring Automations To Stay Consistent</h2>

<p>The recurring automation feature is the practical difference between “we should blog more” and “our blog actually stays active.”</p>

<p>Instead of manually revisiting content every time, you can schedule posts daily, weekly, or monthly. That is useful when you are managing:</p>

<ul>
  <li>A growing catalog that needs ongoing discovery content.</li>
  <li>Seasonal campaigns that should go live before demand peaks.</li>
  <li>A lean team that cannot handwrite every article.</li>
  <li>Agency clients who need a content calendar that does not stall.</li>
</ul>

<p><img src="/assets/img/posts/2026-05-16-how-to-keep-a-shopify-blog-publishing-without-generic-ai-drafts/image-03-d735d979a481.png" alt="Recurring content calendar illustration" /></p>

<p>For merchants, the benefit is not only time savings. It is momentum. Search engines and customers both see a site that keeps publishing useful material, and that creates more opportunities for internal linking, product discovery, and long-tail traffic.</p>

<h2 id="let-the-app-handle-structure-then-review-what-matters">Let The App Handle Structure, Then Review What Matters</h2>

<p>One reason merchants hesitate to automate is quality control. That is a fair concern.</p>

<p>The solution is not to publish blindly. It is to automate the repetitive structure and review the parts that matter:</p>

<ul>
  <li>Product accuracy.</li>
  <li>Brand voice.</li>
  <li>Claims that need verification.</li>
  <li>Seasonal relevance.</li>
  <li>CTA placement.</li>
</ul>

<p>Supra Blog Automation supports that kind of workflow because it can publish immediately or save drafts for review. That is a better fit for ecommerce teams than a fully hands-off system that pushes out weak content and hopes for the best.</p>

<h2 id="choose-visuals-that-match-the-article-purpose">Choose Visuals That Match The Article Purpose</h2>

<p>Images are not decoration in ecommerce blog content. They help the post feel specific, believable, and tied to the store.</p>

<p>The product file supports several image sources:</p>

<ul>
  <li>Product images from the catalog.</li>
  <li>Stock images.</li>
  <li>AI-generated visuals.</li>
  <li>AI-generated images using product references.</li>
</ul>

<p>That flexibility lets you pick the right visual for the job. A how-to article may benefit from a workflow graphic. A product education article may work better with product imagery. A seasonal guide may need something more editorial or abstract.</p>

<p><img src="/assets/img/posts/2026-05-16-how-to-keep-a-shopify-blog-publishing-without-generic-ai-drafts/image-04-f18f60ca6099.png" alt="AI images versus product photos illustration" /></p>

<p>The point is not to use AI images everywhere. The point is to avoid a one-size-fits-all content system. Use the visual that supports the section, the product, and the reader’s intent.</p>

<h2 id="make-internal-links-part-of-the-plan">Make Internal Links Part Of The Plan</h2>

<p>If the post is meant to support SEO, internal links should be part of the brief, not an afterthought.</p>

<p>That is especially true when the article sits inside a broader publishing system. A useful blog post can connect to:</p>

<ul>
  <li>A product page for the featured item.</li>
  <li>A collection page for shoppers comparing options.</li>
  <li>Another article that deepens the same topic.</li>
  <li>A seasonal or campaign landing page.</li>
</ul>

<p>The right crosslink is not the most recent article. It is the one that helps the reader continue the journey.</p>

<p>Good adjacent reads from the archive:</p>

<ul>
  <li><a href="https://productivity-tech-business.blogspot.com/2026/05/how-to-build-shopify-blog-system-that.html">How to Build a Shopify Blog System That Publishes Better Posts on Schedule</a></li>
  <li><a href="https://productivity-tech-business.blogspot.com/2026/05/how-to-automate-shopify-blog-without_02007664134.html">How to Automate a Shopify Blog Without Generic AI Drafts</a></li>
  <li><a href="https://the-lean-ecommerce.blogspot.com/2026/05/how-to-add-color-swatches-to-shopify.html">How to Add Color Swatches to Shopify Collection Pages Without Code</a></li>
  <li><a href="https://the-lean-ecommerce.blogspot.com/2026/05/how-to-create-ugc-style-shopify-product.html">How to Create UGC-Style Shopify Product Videos Without a Shoot</a></li>
</ul>

<p>Those links work because they sit close to the same audience: Shopify merchants trying to increase product discovery without adding more manual work.</p>

<h2 id="when-to-use-publishing-immediately">When To Use Publishing Immediately</h2>

<p>Immediate publishing makes sense when the article is simple, low risk, and clearly aligned with the brand.</p>

<p>Saving as a draft is better when:</p>

<ul>
  <li>The article includes product claims that need checking.</li>
  <li>The topic is tied to a promotion or launch.</li>
  <li>The store needs editorial approval before publish.</li>
  <li>You want to batch-create content and review it later.</li>
</ul>

<p>That publishing choice is a useful part of the system. It means automation can help whether your team wants speed, review, or a mix of both.</p>

<h2 id="what-a-good-shopify-blog-system-actually-buys-you">What A Good Shopify Blog System Actually Buys You</h2>

<p>A strong blogging system does not just create content. It creates repeatability.</p>

<p>That matters because repeatability leads to:</p>

<ul>
  <li>More consistent organic visibility.</li>
  <li>Better product discovery from search.</li>
  <li>Less pressure on the team to invent a new workflow every week.</li>
  <li>More opportunities to reuse topic clusters and internal links.</li>
</ul>

<p>In other words, the app is most useful when you treat it as part of a content operation, not a shortcut around strategy.</p>

<h2 id="conclusion">Conclusion</h2>

<p>If your Shopify blog stalls because every new post feels too manual, Supra Blog Automation gives you a more durable workflow: structured generation, product-aware content, flexible visuals, and draft-or-publish control.</p>

<p>Start with one focused topic, link it to a real product or collection, and schedule the next post before this one goes live. That is the simplest way to turn blog publishing into a system instead of a scramble.</p>]]></content><author><name>The Lean Ecommerce</name></author><category term="how-to" /><category term="supra-blog-automation" /><category term="shopify" /><category term="blog-automation" /><category term="seo" /><category term="content-marketing" /><summary type="html"><![CDATA[Use Supra Blog Automation to keep your Shopify blog active with SEO structure, product context, and reviewable publishing workflows.]]></summary><media:thumbnail xmlns:media="http://search.yahoo.com/mrss/" url="https://how-to-blog.gitlab.io/assets/img/posts/2026-05-16-how-to-keep-a-shopify-blog-publishing-without-generic-ai-drafts/cover-137f14cbfad6.png" /><media:content medium="image" url="https://how-to-blog.gitlab.io/assets/img/posts/2026-05-16-how-to-keep-a-shopify-blog-publishing-without-generic-ai-drafts/cover-137f14cbfad6.png" xmlns:media="http://search.yahoo.com/mrss/" /></entry></feed>