If you have a Webflow site that is finished enough to ship but too expensive or too locked-in to keep hosting the old way, the practical move is to export it to static files and host it somewhere simpler. That is what ExFlow.site is for: you paste in a Webflow URL, choose what to export, and get a downloadable static site that can also sync to Git, S3, or FTP.
This is not a “scrape the page and hope” workflow. ExFlow is built around Webflow’s structure, so it can export pages, CSS, JavaScript, images, media files, and even CMS content instead of flattening the site into something brittle. If you have ever tried a generic downloader and ended up with broken layouts or missing bindings, this is the difference that matters.
What You Need Before You Start
Before you click anything, decide where the exported site is going to live.
- If you just need the files, plan to download the export and move it yourself.
- If you want version control, use the Git sync option.
- If you want object storage, use S3 sync.
- If you are still on a traditional server, use FTP sync.
- If you want the easiest path, use ExFlow hosting and link a custom domain later.
You should also know whether the site relies on CMS pages, custom scripts, or extra media files. That matters because the export settings you choose determine whether the static copy feels complete or half-finished.
1. Paste the Webflow URL
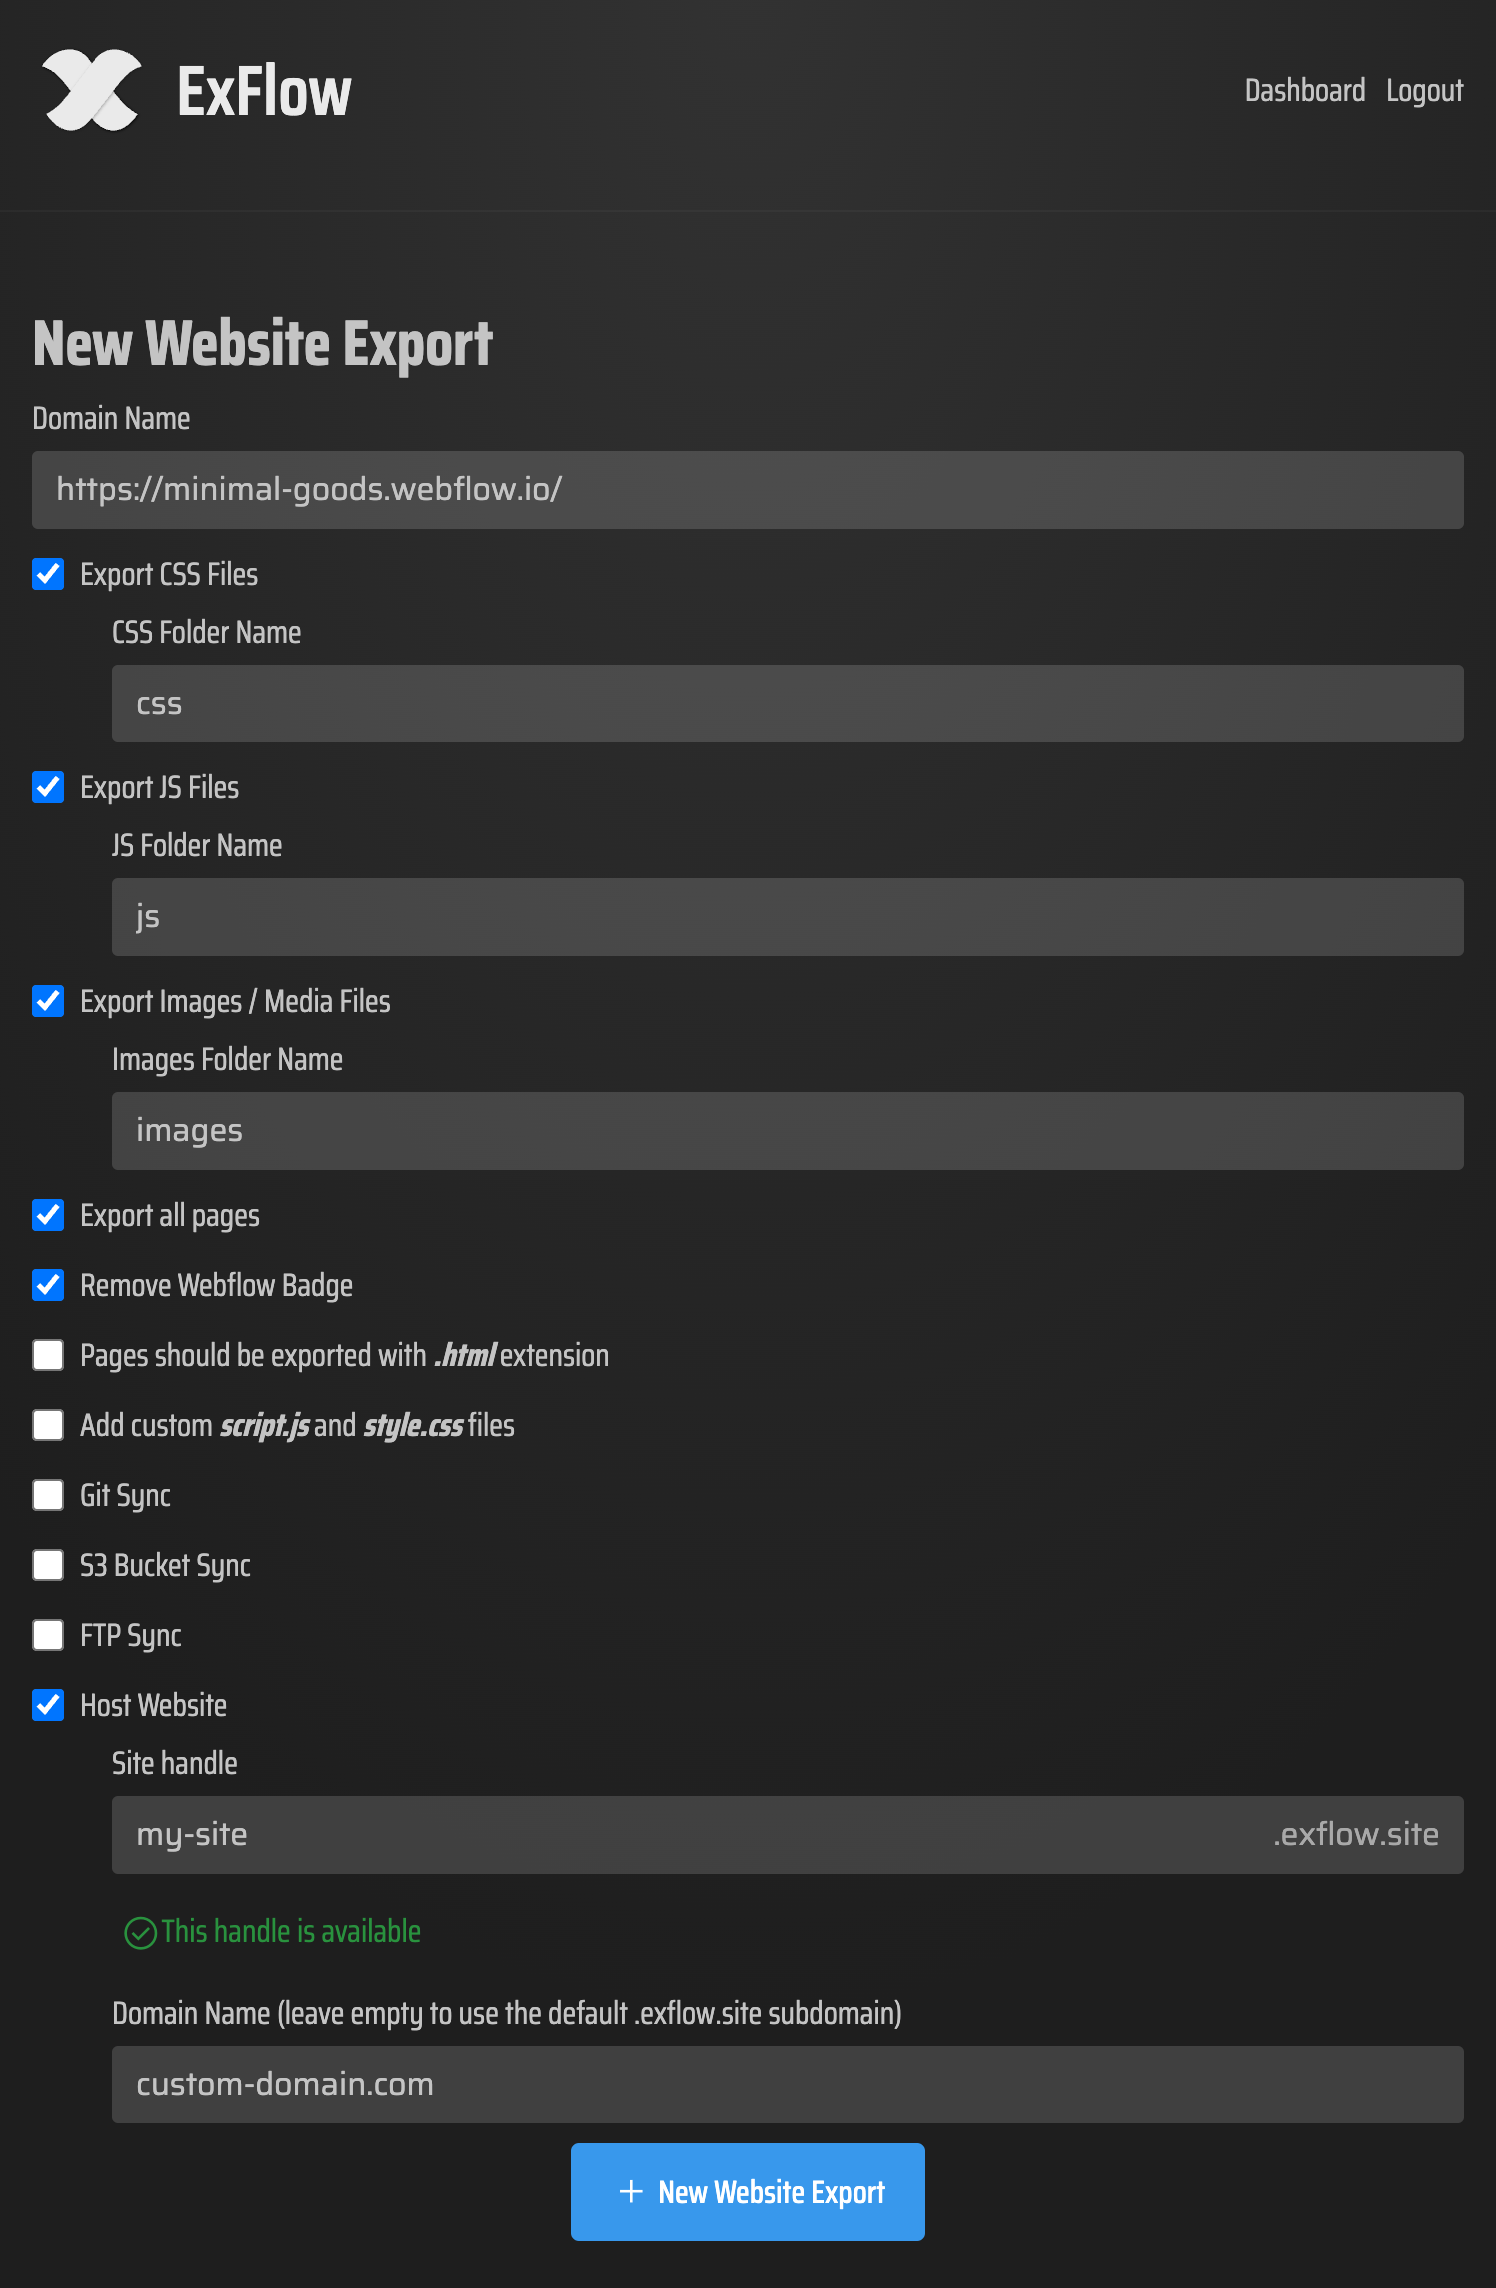
Open ExFlow.site and enter the site URL you want to export. The interface is intentionally simple: the main job is to identify the site before you choose what gets packed into the export.
At this stage, the goal is not to tweak every option. It is just to confirm you are exporting the right Webflow site before you touch the rest of the settings.
2. Choose the Export Settings That Match Your Site
Turn on the settings that map to the way your Webflow project actually works.
- “Export CSS Files” if you want the styling preserved.
- “Export JS Files” if your site uses script-driven interactions or custom logic.
- “Export Images / Media Files” if the site depends on uploaded assets.
- “Export All Pages” if you want the full site, not just the visible landing page.
- “Remove “Made with Webflow” Badge” if you want the exported copy to look like a finished static site.
- Add custom “script.js” and “style.css” files if your deployment needs extra overrides.
If the site uses CMS content, this is the moment to be careful. The whole point of using a Webflow exporter instead of a simple mirror tool is that the structure stays useful after export. That is also why I would reach for ExFlow instead of a generic tool like HTTrack when the site has dynamic content, animations, or CMS bindings.
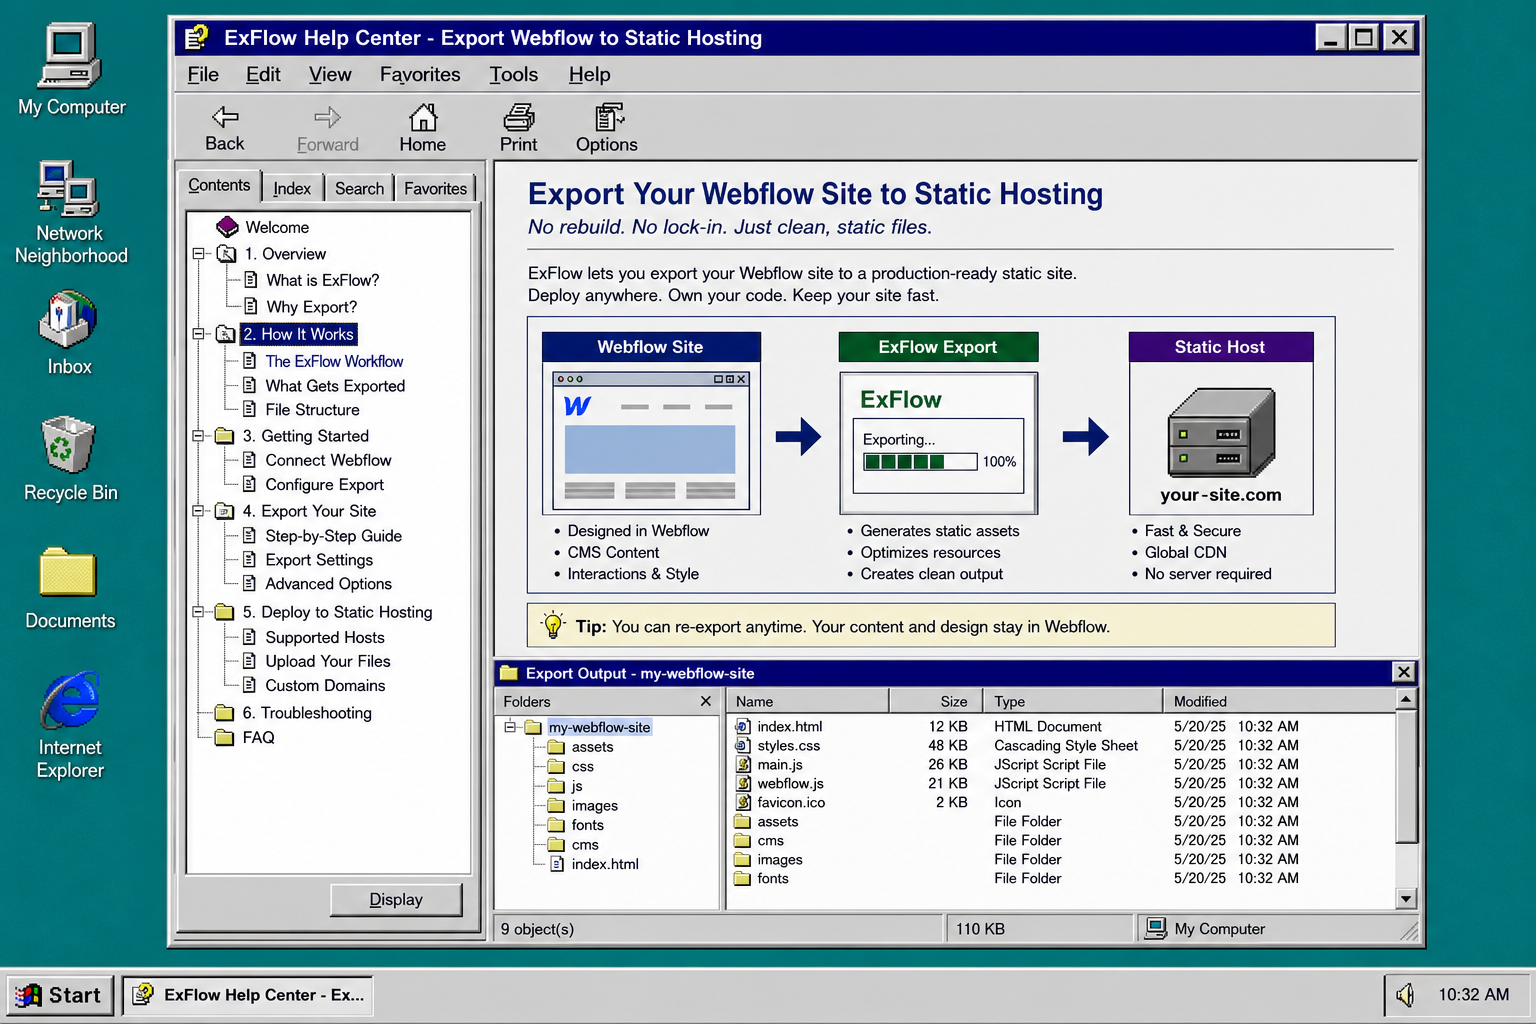
The generated workflow diagram above is what this step looks like conceptually: source site on one side, static files in the middle, hosting on the other. Simple in theory, but only if the exporter respects the pieces that Webflow actually depends on.
3. Export All Pages and Check the File List
Run the export and wait for the static package to finish. When it succeeds, you should see a file list that includes HTML pages and the assets needed to render them.

What you want to see is straightforward:
- pages exported with the “.html” extension
- stylesheet files present
- JavaScript files present if you enabled them
- image and media assets copied across
- any CMS-driven pages represented in the output
If the export looks too small, the site probably lost something important. That usually means one of the export toggles was off, or the site depended on files that were not included.
4. Pick the Hosting Path
Once the export is done, choose the deployment path that fits the rest of your stack.
- Download the package if you want to upload it somewhere else manually.
- Use Git sync if you want the static site to land in a repository first.
- Use S3 sync if your team prefers object storage and simple static hosting.
- Use FTP sync if you already have a traditional server workflow.
- Use ExFlow hosting if you want the simplest end-to-end option.
If you are specifically trying to move a Webflow site onto GitHub Pages, I covered that route in How to Export a Webflow CMS Site to GitHub Pages Without Rebuilding It, How to Replace Webflow Hosting With GitHub Pages Using ExFlow, How to Export a Webflow CMS Site Without Losing Dynamic Content, and How I Exported My Webflow CMS Site to Static Hosting Without Rebuilding It. Those are the closest companion posts if your real decision is about where the static files should land.
5. Verify the Export Like You Mean It
Do not stop at “the export finished.” Open the output and check the parts that usually break first.
- Load a CMS page and confirm the content is there.
- Check one page with images so you can see whether the media assets came across.
- Inspect the CSS and JS references so the page is not falling back to default browser styling.
- If you changed hosting, verify the custom domain and status page before you switch traffic.
This is the step that keeps the migration from becoming a support ticket later. A static export is only useful if it still behaves like the site the visitor expected to see.
Common Mistakes
The most common mistakes are boring, but they are also the ones that waste the most time.
- Forgetting to enable “Export Images / Media Files” and then wondering why half the page is blank.
- Leaving off “Export All Pages” and discovering that CMS pages never made it into the package.
- Uploading the export and assuming the “.html” files will sort themselves out without the right server settings.
- Pasting sensitive Git, FTP, or S3 credentials into the wrong place and not treating them like real secrets.
- Forgetting that the exported site still needs verification after it lands on the new host.
When ExFlow Is the Better Fit
ExFlow is the right tool when you want a Webflow exporter, not a rebuild.
That matters if the original site has animations, dynamic content, CMS bindings, or enough structure that a plain static mirror would be too fragile. It also matters if you want a cheaper hosting setup without throwing away the work already done in Webflow.
If your site is simple enough that a basic download would be fine, this might be more tool than you need. But if you care about keeping the site intact while moving it somewhere more controllable, ExFlow is doing the important part for you.
The Short Version
Paste the Webflow URL, choose the right export settings, confirm the file list, and then send the static output to Git, S3, FTP, or ExFlow hosting. If the exported files still match the site you expected, you are done.
If you want to try it on a real site, start at ExFlow.site and export one page first. That tells you quickly whether the workflow fits your site before you move the whole thing.