How to Build a Portable Video Workflow Around VideoJSON
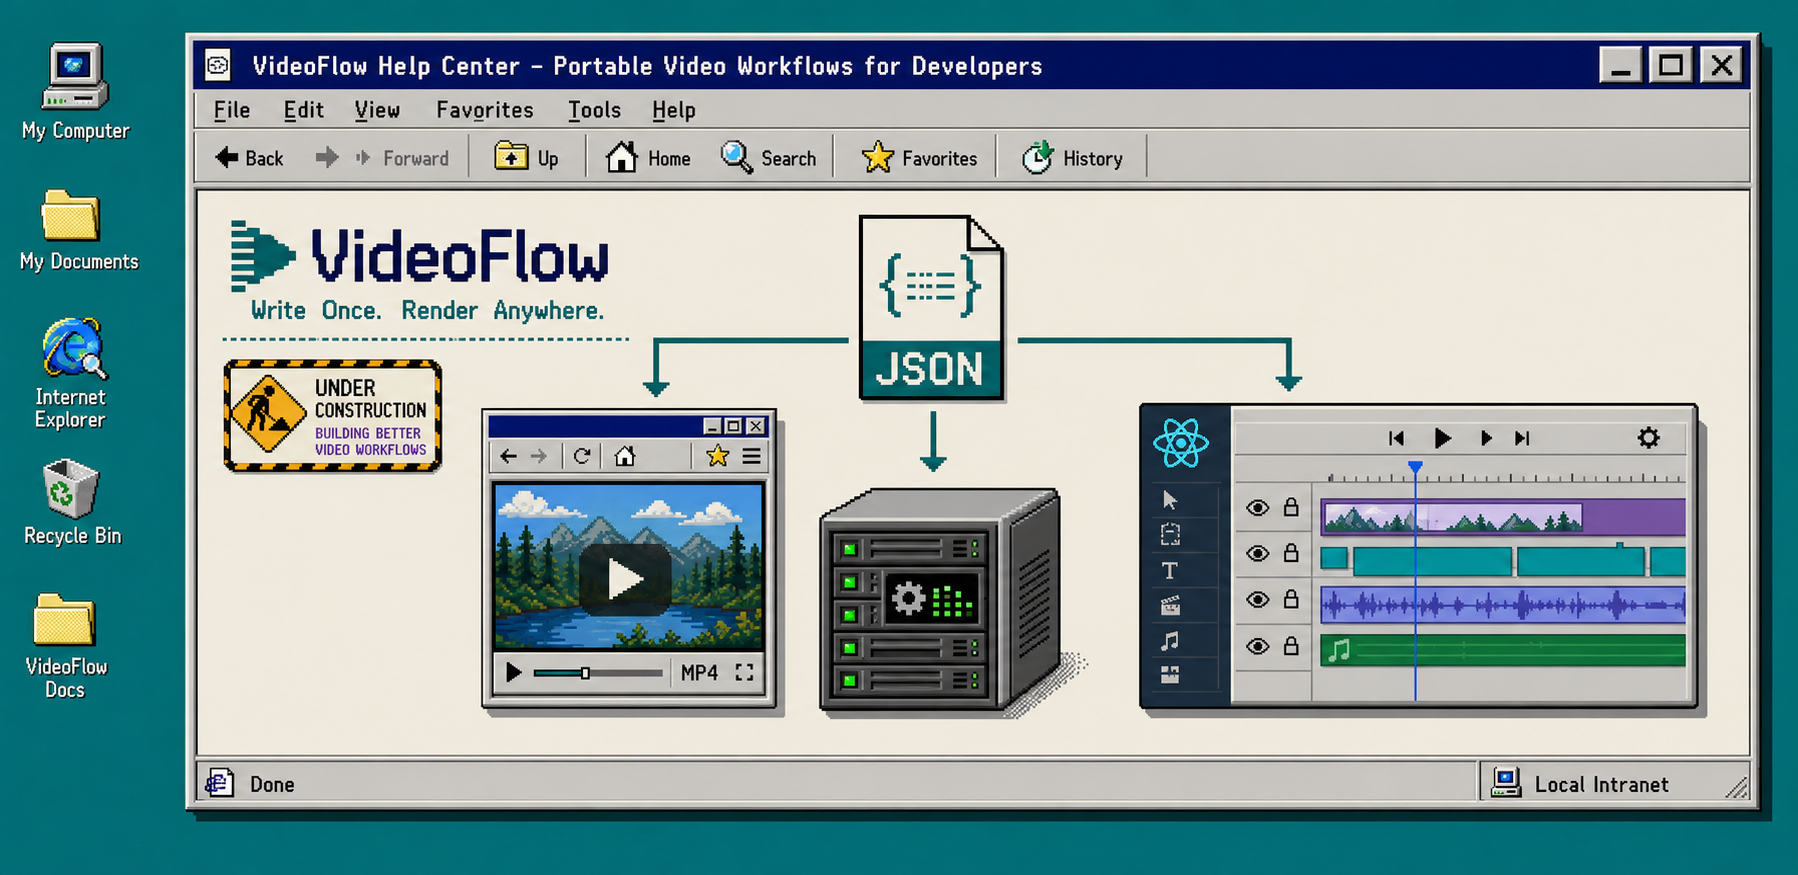
If you want one video template to preview in the browser, edit in React, and export from Node without maintaining three copies of the same scene, build around portable VideoJSON. VideoFlow is set up for that pattern: the core compiles your template into a JSON artifact, and the renderers read the same structure in different environments. For the first pass, you only need Node.js, `@videoflow/core`, and public asset URLs. The core docs are here: https://videoflow.dev/core.
1. Start With One Scene Contract
If the template is not stable, everything downstream becomes noise. Define the project size, frame rate, and the small set of fields your scene really needs: headline, CTA, media URL, and any timing constants that should not drift from render to render.
import VideoFlow from "@videoflow/core";

const $ = new VideoFlow({
  name: "Launch Clip",
  width: 1920,
  height: 1080,
  fps: 30,
});

$.addText(
  { text: "Summer launch", fontSize: 7, fontWeight: 800 },
  { transitionIn: { transition: "overshootPop", duration: "500ms" } }
);

const videoJSON = await $.compile();
At this point, you should have one portable JSON payload, not a second hand-edited version for previews or exports. If you want the Git side of that workflow, How to Make Video Templates Diffable in Git with VideoFlow is the right companion piece.
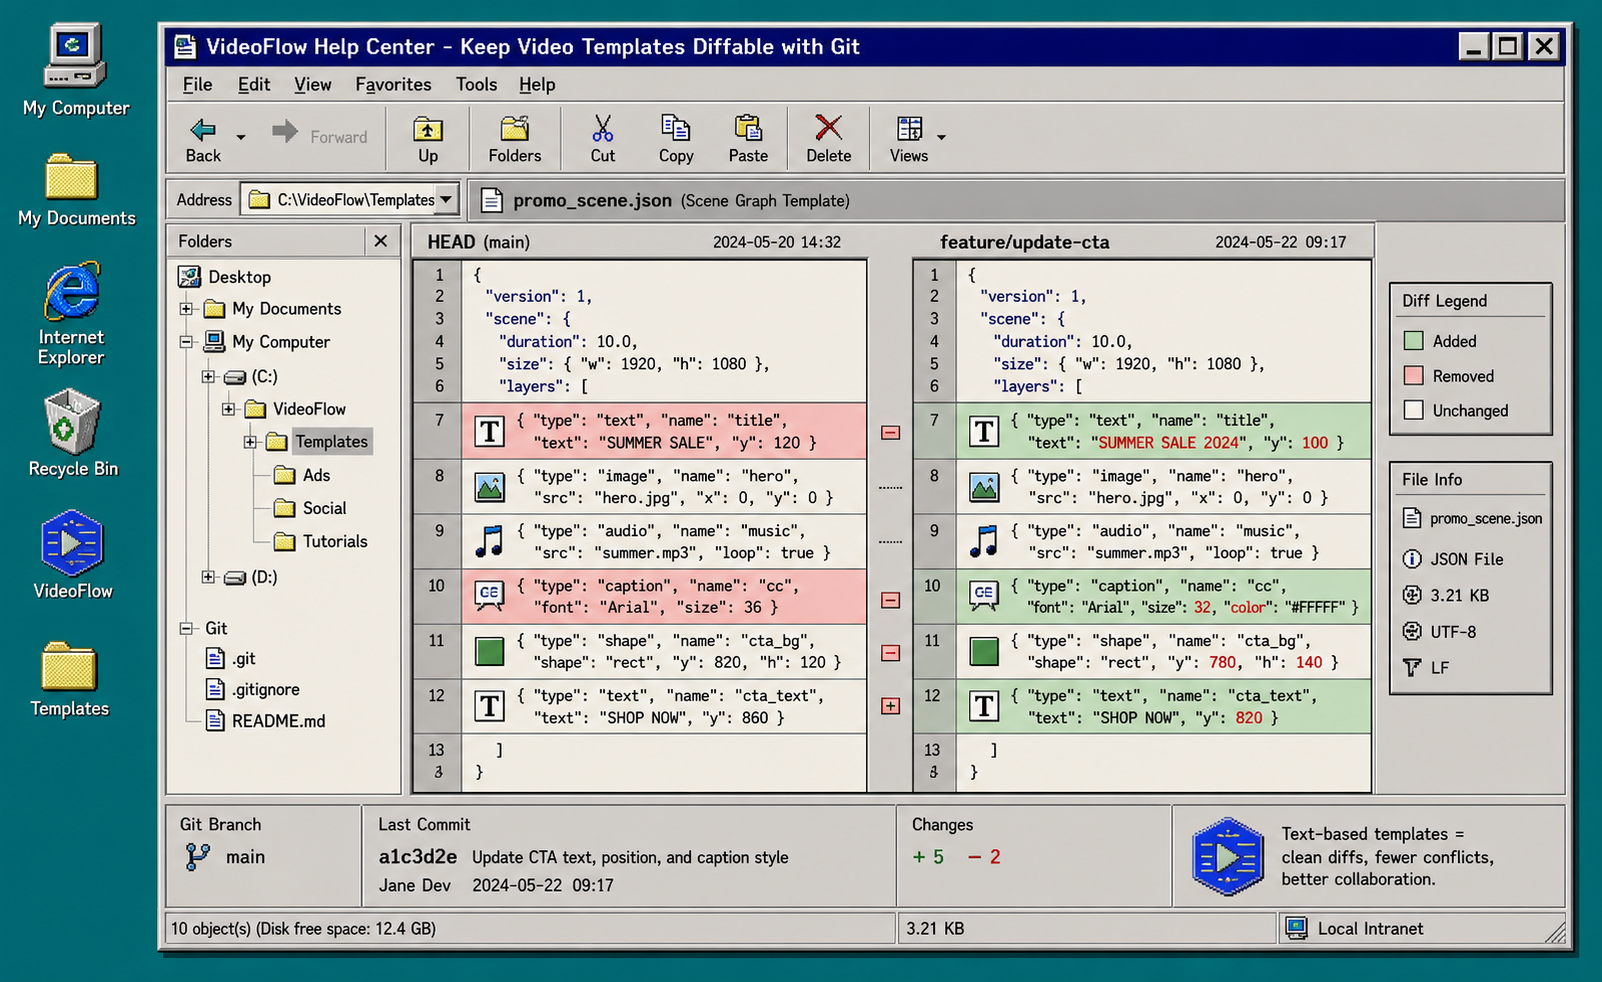
That image matters because a JSON-first template is easier to review than a timeline screenshot. When a teammate changes copy, timing, or a layer property, you can see the exact diff instead of guessing what moved.
2. Keep Data Separate From Layout
Treat the scene builder as layout code and the values as content data. In practice, that means your template decides where text goes, while a separate object decides what the text says. Keep asset URLs public, keep field names stable, and validate the data before you render.
This is the part that saves you later when product copy, offers, or image URLs change. If the data contract stays small, How I Keep Video Templates Stable as Data Changes applies cleanly: the scene stays the same, and only the inputs move.
A good checkpoint is simple: if someone can change the headline without touching animation logic, the split is working.
3. Render The Same JSON Everywhere
VideoFlow’s main advantage is portability. The same VideoJSON can feed the browser renderer, the server renderer, and the live DOM preview. The renderers docs are here: https://videoflow.dev/renderers.
Use the browser renderer when a user needs local export or a zero-upload workflow. Use the server renderer when you need queue jobs, batch rendering, or API-driven output. Use the DOM renderer when you want a live preview that stays frame-accurate while someone edits.
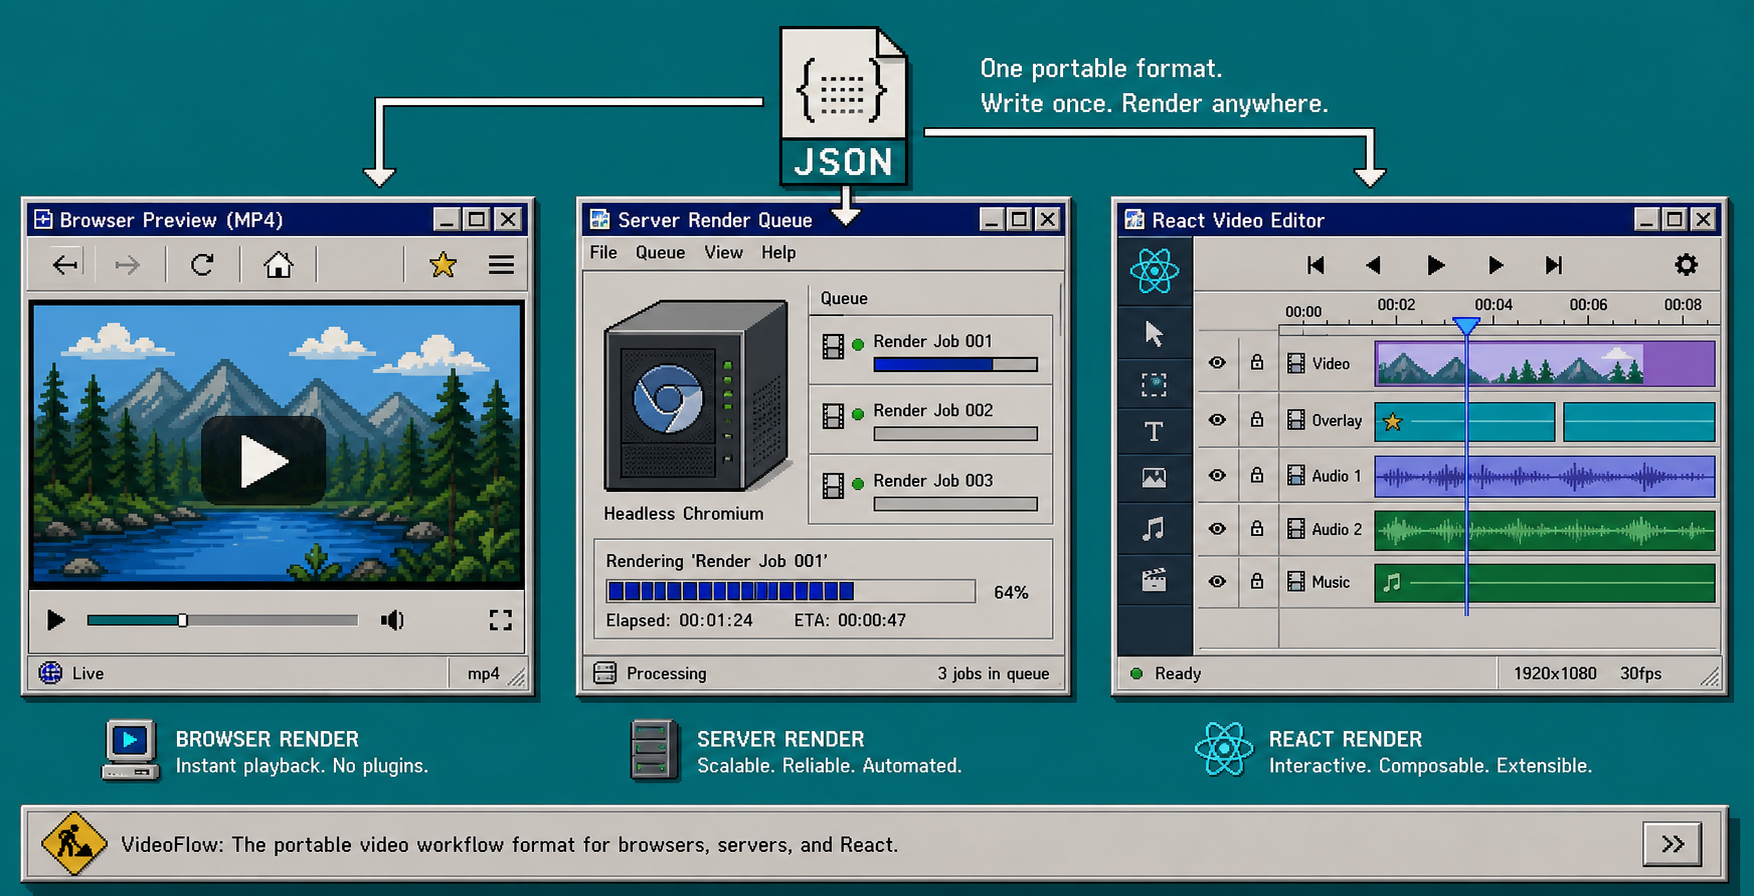
If you are deciding whether to keep rendering in the browser or move it to Node, How to Add Browser MP4 Export Without Forking Your Video Template is the practical follow-up. If you want the bigger systems view, How I Keep One Video Workflow Portable Across Browser, Server, and React shows the pattern end to end.
4. Add The React Editor Only When You Need Human Edits
Do not put an editor in front of an unstable format. Wait until the template contract is clean, then add `@videoflow/react-video-editor` so a human can adjust the same JSON instead of creating a second workflow.
import { VideoEditor } from "@videoflow/react-video-editor";
import "@videoflow/react-video-editor/style.css";

<VideoEditor
  video={videoJSON}
  onChange={(next) => saveToServer(next)}
  onSave={async (next) => persist(next)}
  onUpload={async (file) => upload(file)}
  theme="dark"
/>
The useful part here is not just the timeline. It is the contract: the editor, the preview, and the export path all speak the same format. That is what keeps you out of the usual “the UI looks right but the render is different” trap. If you want the layout and export story to stay manageable over time, How I Keep Video Templates Maintainable Across Preview, Edit, and Export is the companion article.
5. Review The Output Before You Ship It
Do one final pass before you publish or hand the file to an automation. Check these items in the rendered output:
- asset URLs resolve
- fonts exist in every environment
- durations match between preview and export
- the canvas size is the one you expect
- captions and audio still line up after the last edit
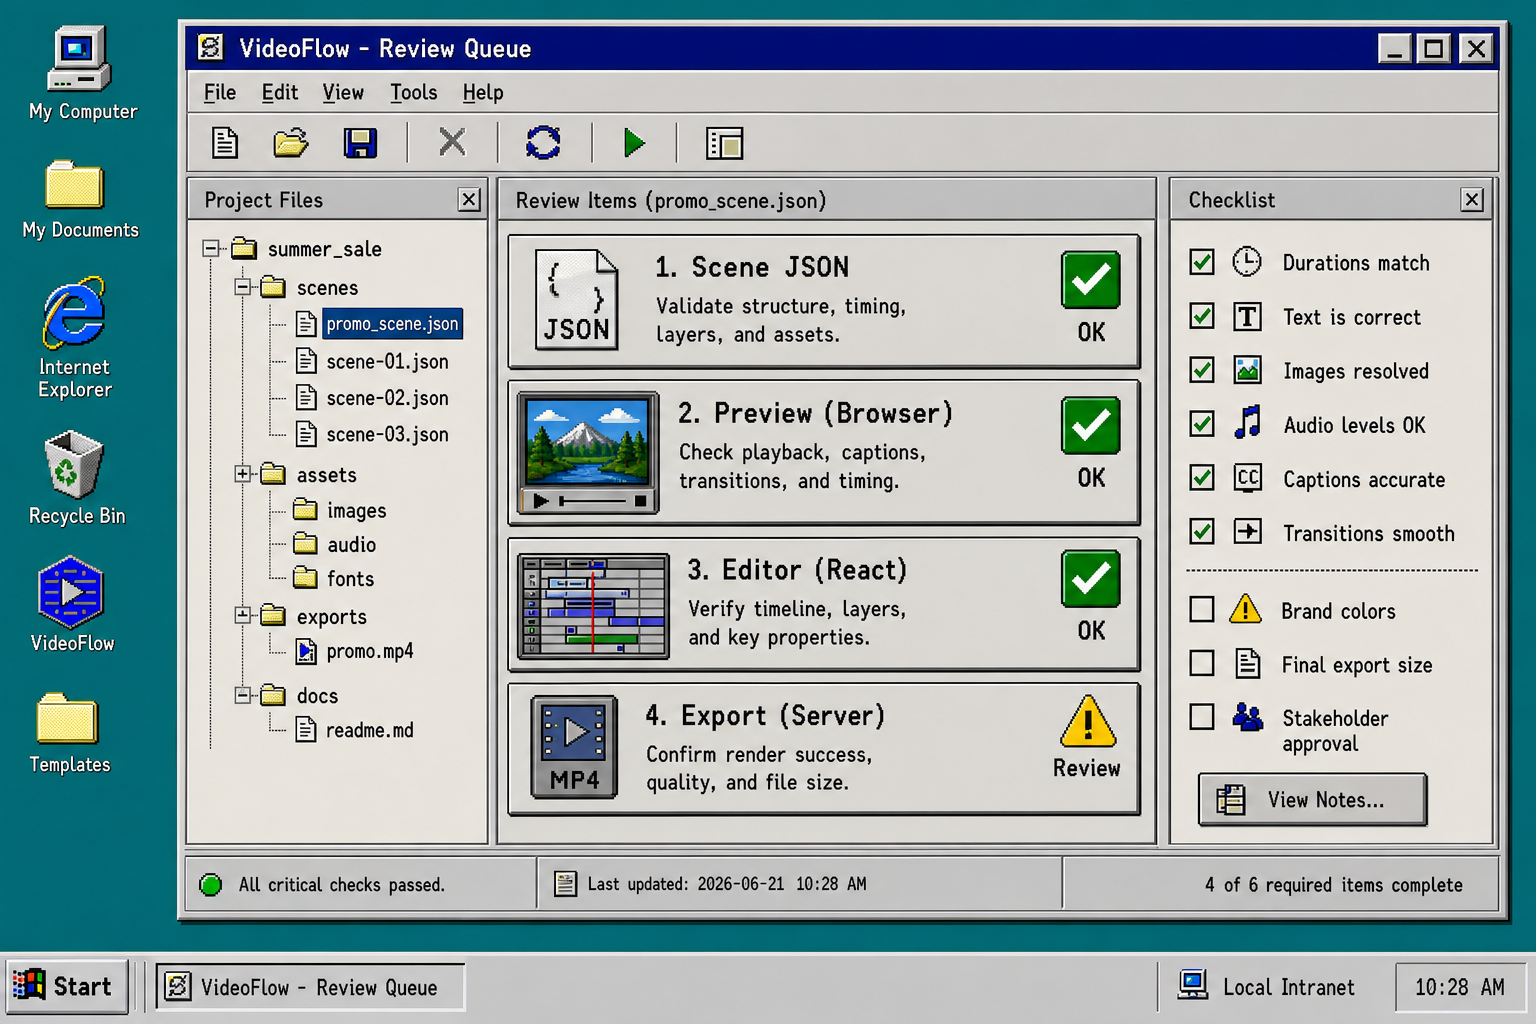
That last checkpoint matters even when the template is automated. The workflow is only as good as the review gate in front of publish. A small approval step catches broken URLs, off-by-one timing, and invisible font changes before they become production problems.
Troubleshooting
If the browser preview and the server export do not match, start with the boring checks first. Most mismatches come from different asset paths, missing fonts, or a width/height/fps mismatch between environments.
If the editor changes are not persisting, make sure `onChange` writes the updated JSON somewhere durable. If the render fails but the preview looks fine, inspect the image and video URLs first. If they are local paths instead of public URLs, the browser or server renderer may not be able to fetch them.
If your team wants a broader checklist for that stage, the review image above should look familiar. That is the point: make render validation routine, not tribal knowledge.
Finish
Start with `@videoflow/core`, compile one scene, and keep that JSON as the source of truth. Once the template is stable, add the renderer path you actually need, then add the React editor only if a human must touch the timeline. From there, the core docs, playground, and GitHub repo are enough to get the first workflow running.