If you write in Notion and publish in Webflow, the usual failure mode is easy to spot. The CMS item arrives, but images shift, links break, and the formatting no longer matches the page you reviewed. SyncFlow is built to close that gap by letting you map Notion database fields to Webflow CMS fields before you sync.
You need three things before you start: a Notion database, a Webflow CMS collection, and a SyncFlow account. If you are still deciding which content belongs in the CMS, open How I Decide What Should Sync From Notion Into Webflow in another tab. If you already want the full pipeline view, keep How I Build a Clean Notion-to-Webflow Publishing Pipeline With SyncFlow nearby too.
1. Prepare your Notion database
Start with a database that separates article content from article metadata. Keep a title field, a summary field, a cover image field, a slug field, a status field, a publish date field, a tags field, and one body field for the content itself.
That structure makes the sync predictable. SyncFlow can handle text, images, checkboxes, dates, URLs, code blocks, and TeX, so the job is not to cram everything into one property. The job is to give every piece of content a clear place to land in Webflow.
If you already know your article is supposed to become a CMS entry, keep the page clean. Do not split the body across a bunch of extra properties. The fewer surprises in Notion, the less cleanup you need in Webflow later.
2. Connect SyncFlow to Webflow and Notion
Go to the SyncFlow website and click “Get Started”. Approve access to your Webflow site, then open the SyncFlow app inside the Webflow designer.
From there, connect Notion and choose the exact page or folder you want to sync. You should end up with a setup where Webflow is the destination and Notion is the source of truth.
If you want to see the flow once before you try it yourself, watch How to sync Notion with Webflow - Full Tutorial. It is a quick way to confirm the order of operations before you start mapping fields.
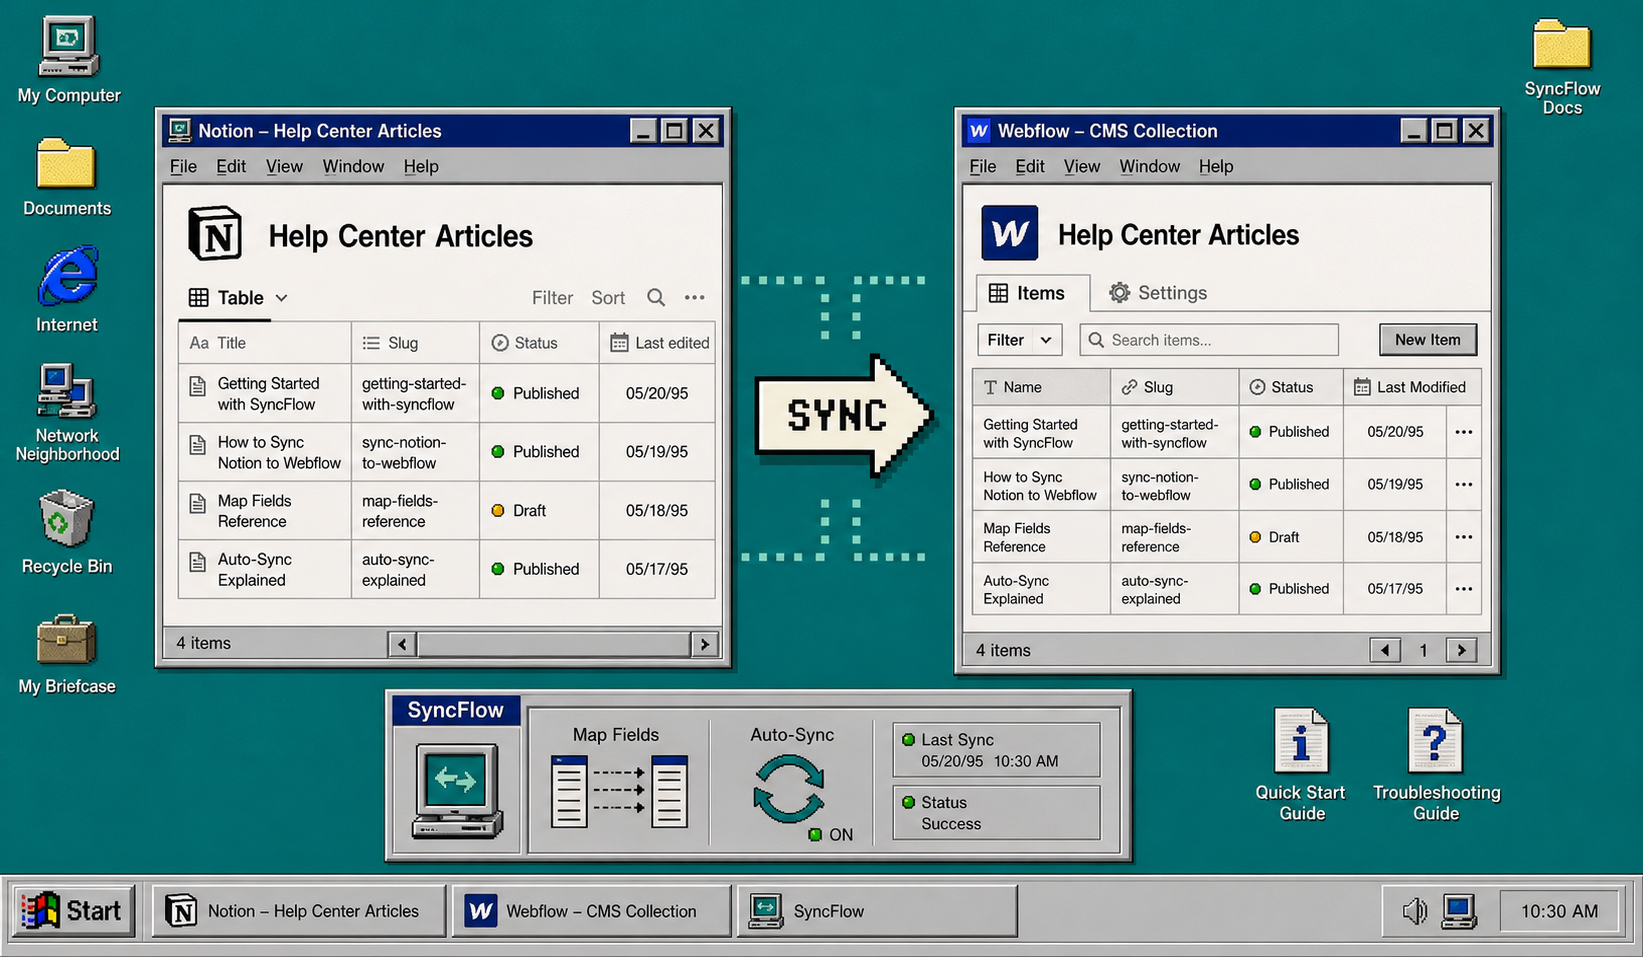
3. Map fields one by one
Click “Sync a new database”, then select the Webflow collection you want to fill. Match each Notion field to the correct Webflow field and do not guess. The mapping screen should feel explicit: one source field, one destination field, one clear purpose.
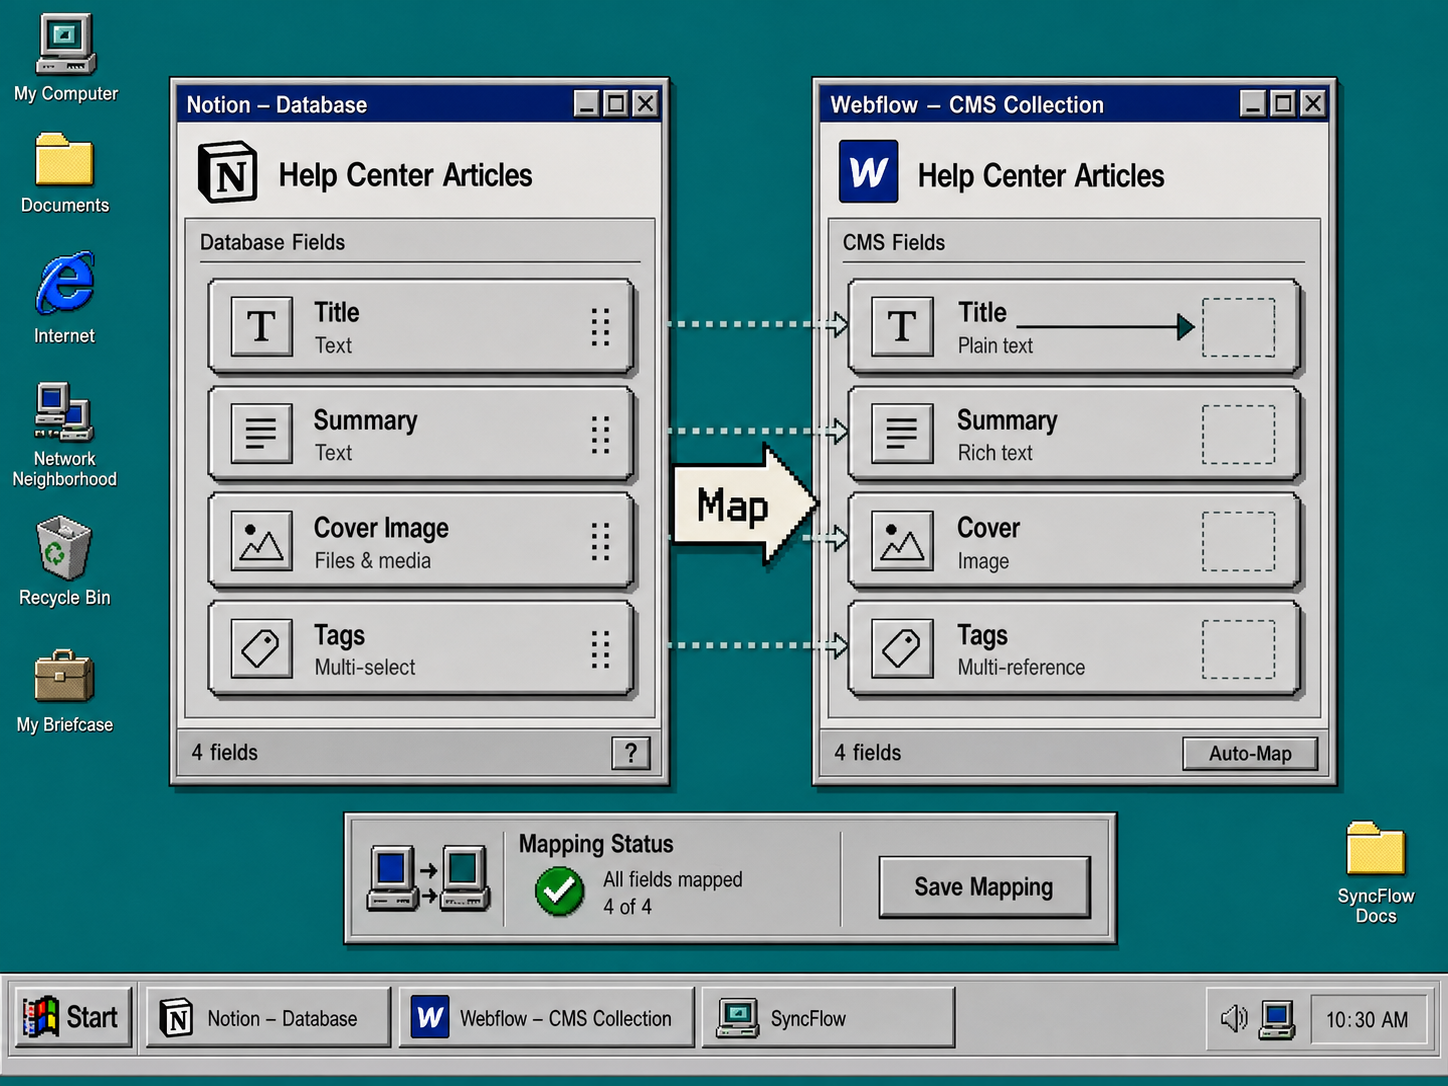
This is the part that matters most. If the title lands in the wrong Webflow field, the whole collection feels off. If the image property is mapped incorrectly, the article may look fine in Notion and broken in Webflow.
The field map above is the real checkpoint. Once title, summary, cover image, tags, and status all line up, you have a sane sync boundary.
If you need a second example of the workflow, How to Turn Notion Drafts Into Webflow CMS Posts With SyncFlow shows the editorial version of the same handoff.
4. Choose Inline Styles or Use Classes
Decide how much of the Notion formatting should survive exactly as written. Choose “Inline Styles” when you want the imported content to look as close as possible to the source page. Choose “Use Classes” when you want reusable styling and cleaner maintenance across many collection items.
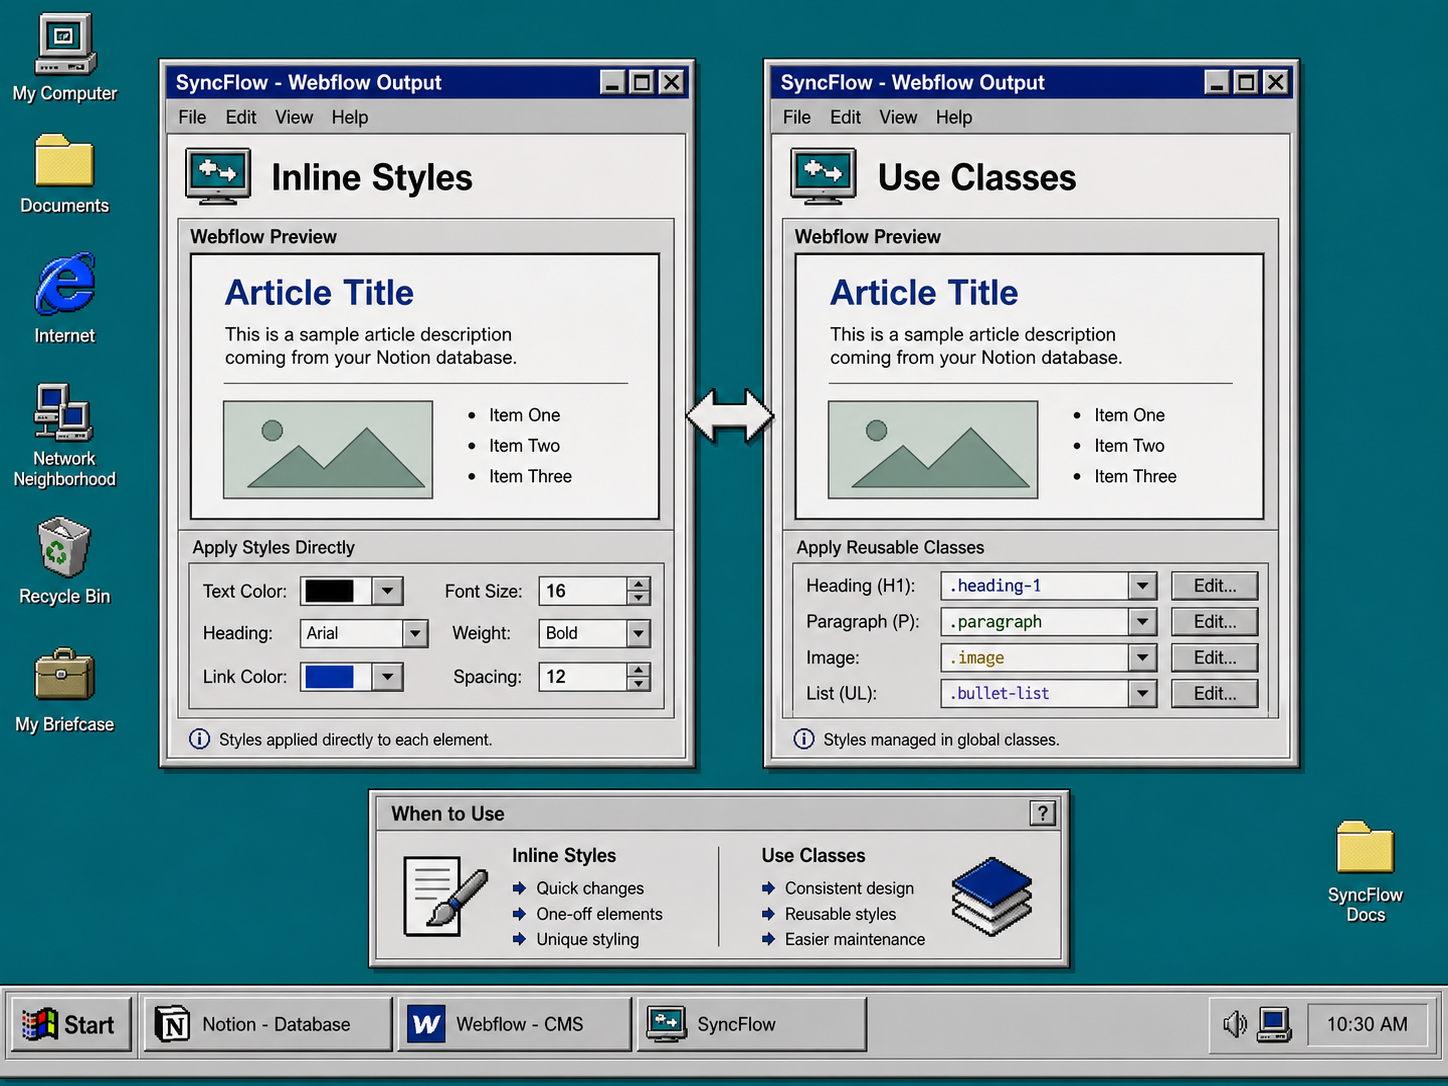
The comparison above is the useful mental model. Inline styles are better for one-off content and quick fidelity checks. Classes are better when your Webflow site already has a design system and you want imported content to match it consistently.
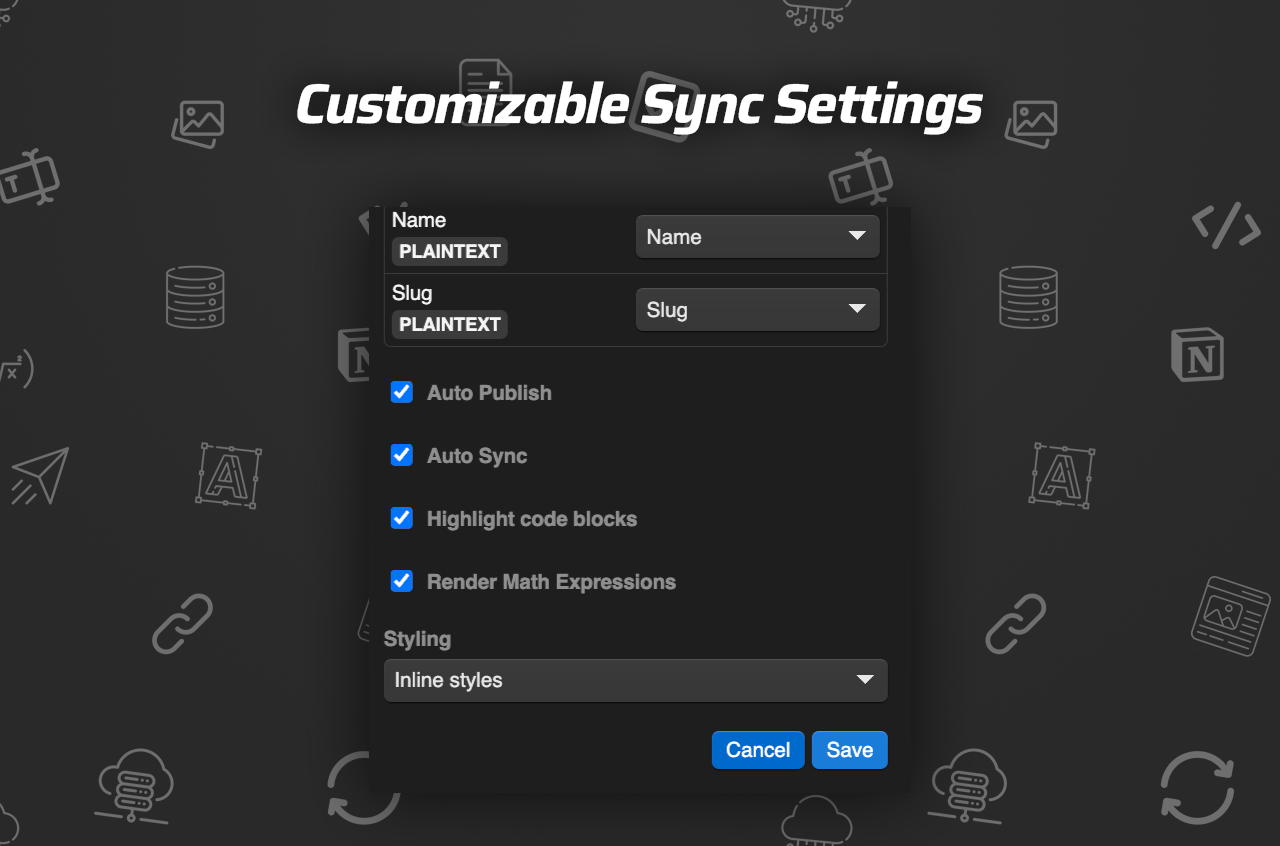
Use the settings screen after the first sync passes. That is where you decide whether the pipeline should stay manual, update automatically, or publish changes as soon as Notion changes.
5. Run a test sync and inspect the result
Create one draft item in Notion and sync it into Webflow. Then open the Webflow CMS collection and inspect the record carefully. Check the title, slug, summary, cover image, tags, status, and body content.
Do not stop at the list view. Open the actual item and inspect the body for images, links, code blocks, and TeX. SyncFlow says it supports all of those, so if one of them looks wrong, the mapping or content structure is usually the thing to fix.
After the first item looks right, turn on “Auto-Sync”. If you want the collection to update immediately after edits, enable “Auto-Publish” too.
For a broader launch pattern, How to Prevent Notion-to-Webflow CMS Drift After Launch is the next article to read before you scale the setup.
6. Troubleshoot the common failures
If an image is missing, check the Notion field type first. It needs to be a real image or media field, not a text field with a pasted URL. Also make sure the asset is reachable when SyncFlow tries to import it.
If the formatting looks wrong, switch from “Inline Styles” to “Use Classes” or simplify the block structure in Notion. Nested blocks, unusual spacing, and mixed formatting are the fastest way to make a sync look messy.
If page links break, confirm that the linked Notion page is part of the same synced content set and that the slug field is filled in. SyncFlow can convert page links into Webflow post links, but the source data still needs to be clean.
If nothing updates after you edit the page, verify that “Auto-Sync” is actually on and that you mapped the correct database. Most of the time, the sync is working exactly as configured, which means the configuration is the problem.
If you want a checklist for that pass, keep My Checklist for Syncing Notion Articles Into Webflow CMS open as a second reference.
Finish the setup
SyncFlow works best when you treat Notion as the editor and Webflow as the delivery system. Map the fields, test one item, verify the result, and only then turn on auto-sync for the full database.
If you want to build the same setup now, open SyncFlow, wire up one collection, and publish a single test item before you scale it to the rest of the database.