If I rush the setup, the scan usually reminds me. The product looks fine in person, but the first 3D pass comes back with broken edges, uneven texture, or a shape that feels softer than the real object. The fix is almost never “take more random photos.” It is usually “set up the capture better.”
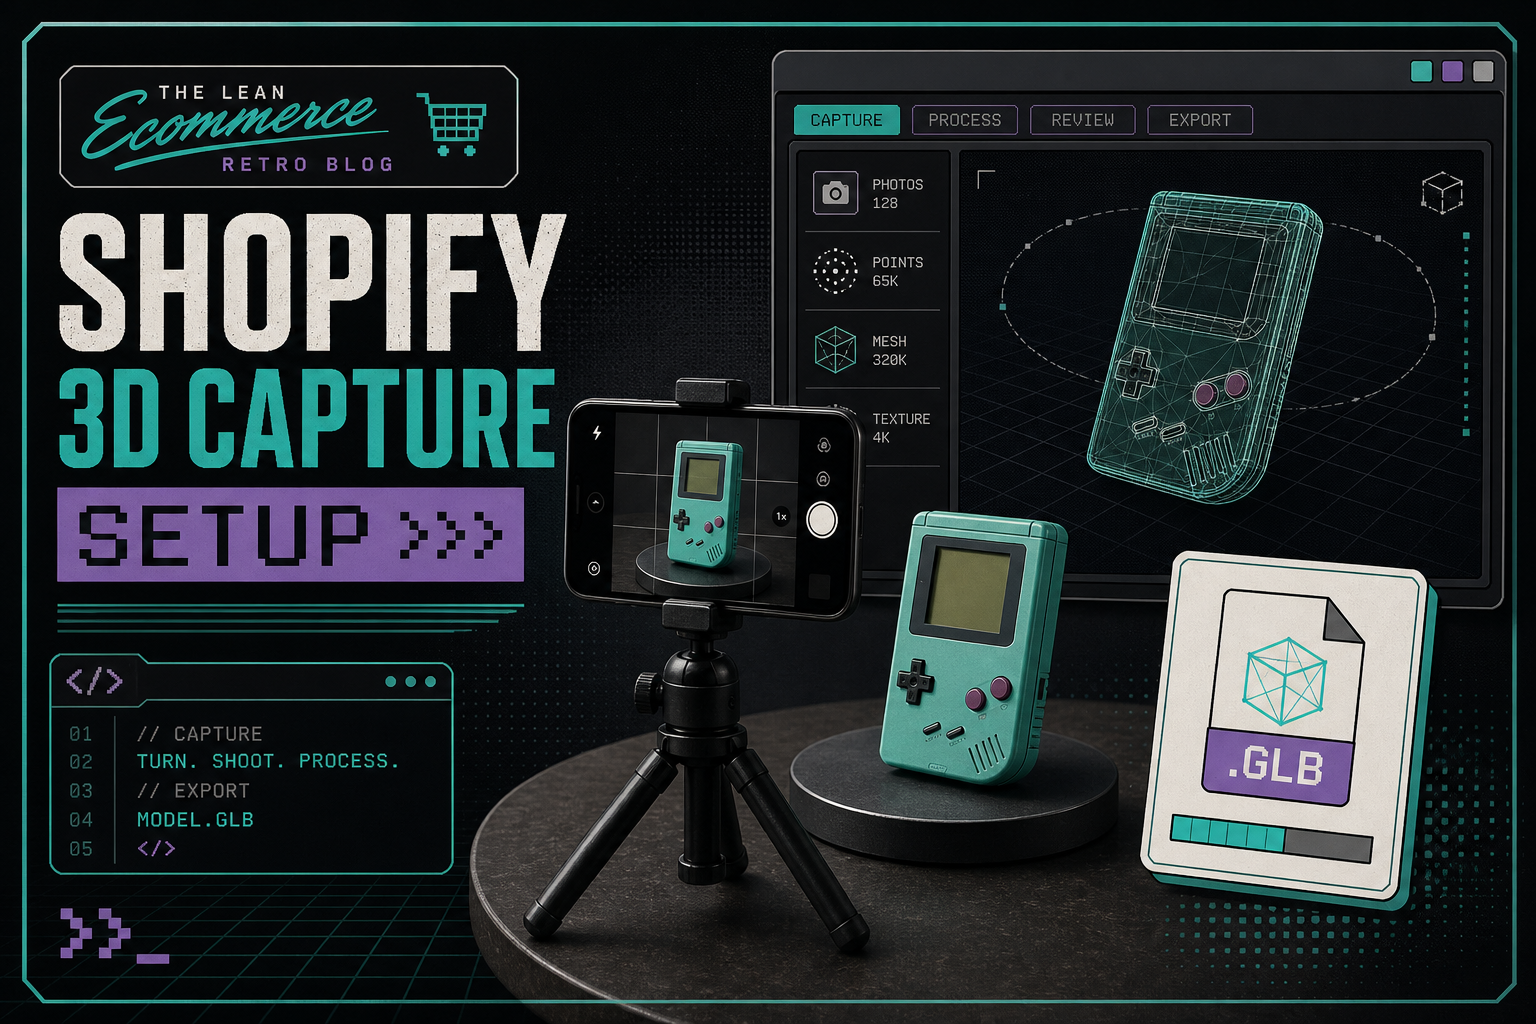
That is the part I care about most when I use Supra 3D Capture. The app is built to turn a short set of guided phone photos into a web-ready GLB, and it works best when the room, product, and camera path are all boring in the right way. No LiDAR. No special rig. Just a clean setup, a regular smartphone, and enough consistency to let the reconstruction pipeline do its job.
If you want the quick version, here it is: choose a product that can actually be scanned, light it evenly, keep the orbit tight, and inspect the result before you publish it to Shopify.
1. Start With A Product That Deserves 3D
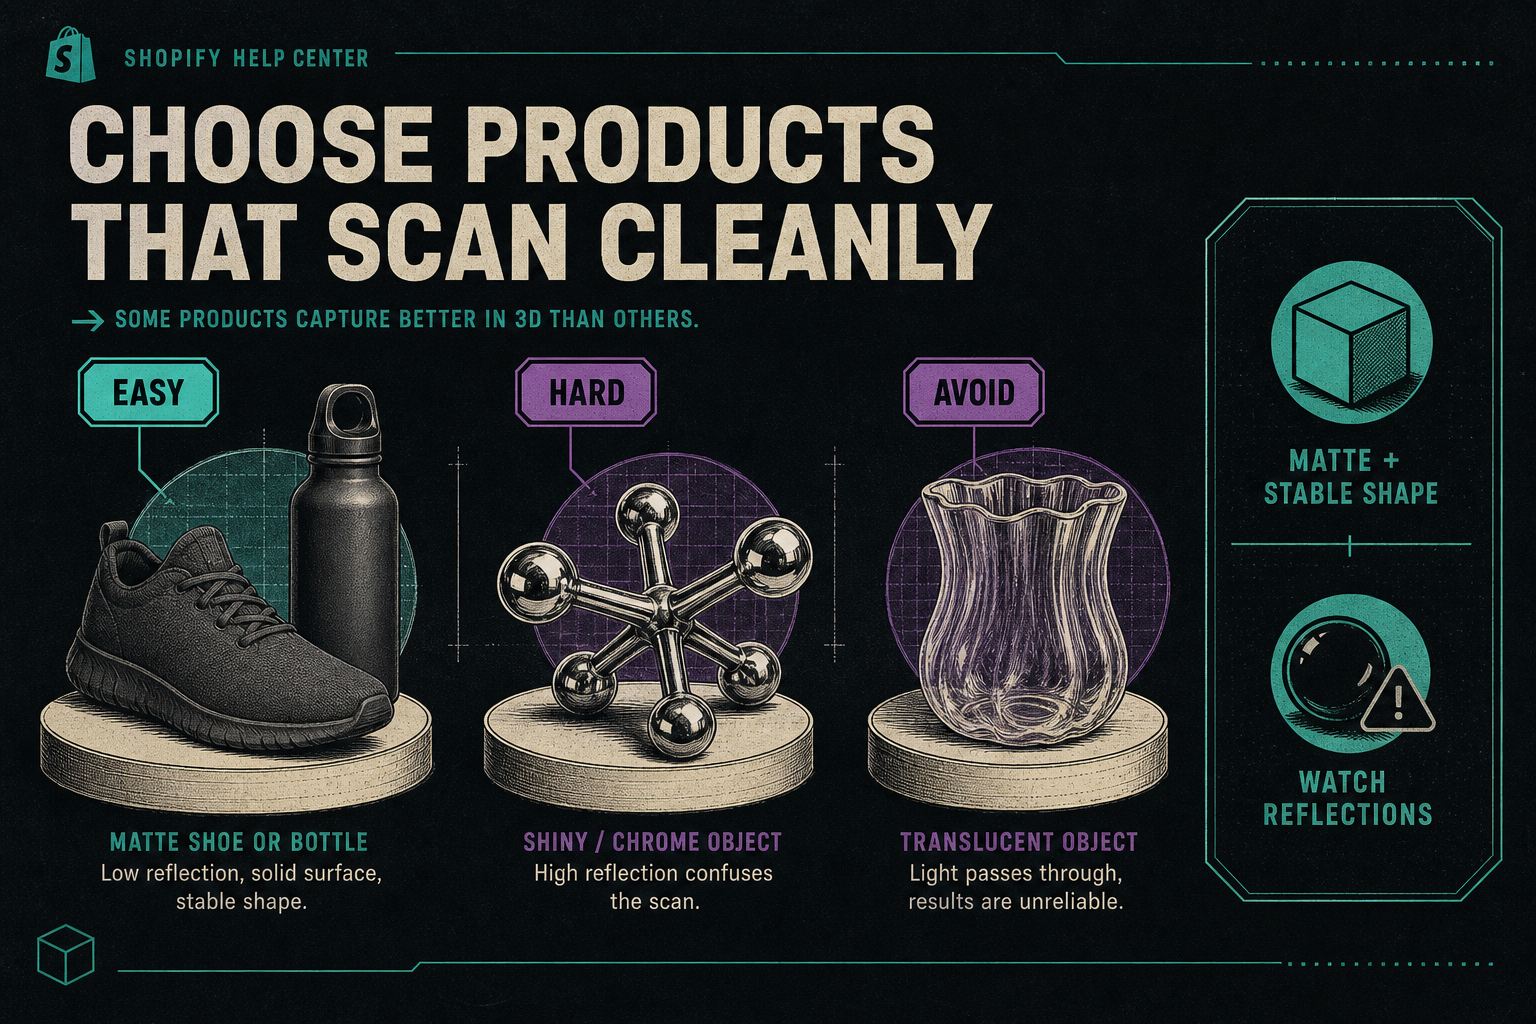
Not every SKU is worth the effort. I usually start with something that has a clear silhouette, a stable base, and enough shape that a shopper would want to rotate it. Shoes, bottles, small home goods, tools, and hard goods tend to behave better than shiny or translucent items.
If you want a formal way to narrow the list, I would read How to Choose the First Shopify Products for 3D Capture before you touch the camera. It is the same basic decision, just one step earlier in the workflow.
I also keep How to Tell If a Shopify Product Will Scan Cleanly in 3D nearby because it gives me a fast yes/no check on shape, surface, and capture space.
The goal is not to find the hardest object you own. The goal is to find the first object that will prove the workflow.
2. Build The Lighting Before You Open The Capture App
Good 3D capture starts with even light. I want soft shadows, low glare, and no mixed color temperatures. If the product has a glossy finish, I try to remove any hard reflections before I worry about the number of photos.
This does not need to be a studio. A light tent, two lamps, and a clean backdrop are usually enough. What matters is that the product stays readable from every angle. If I can see a bright hotspot on the surface with my eyes, the model usually picks up that problem too.
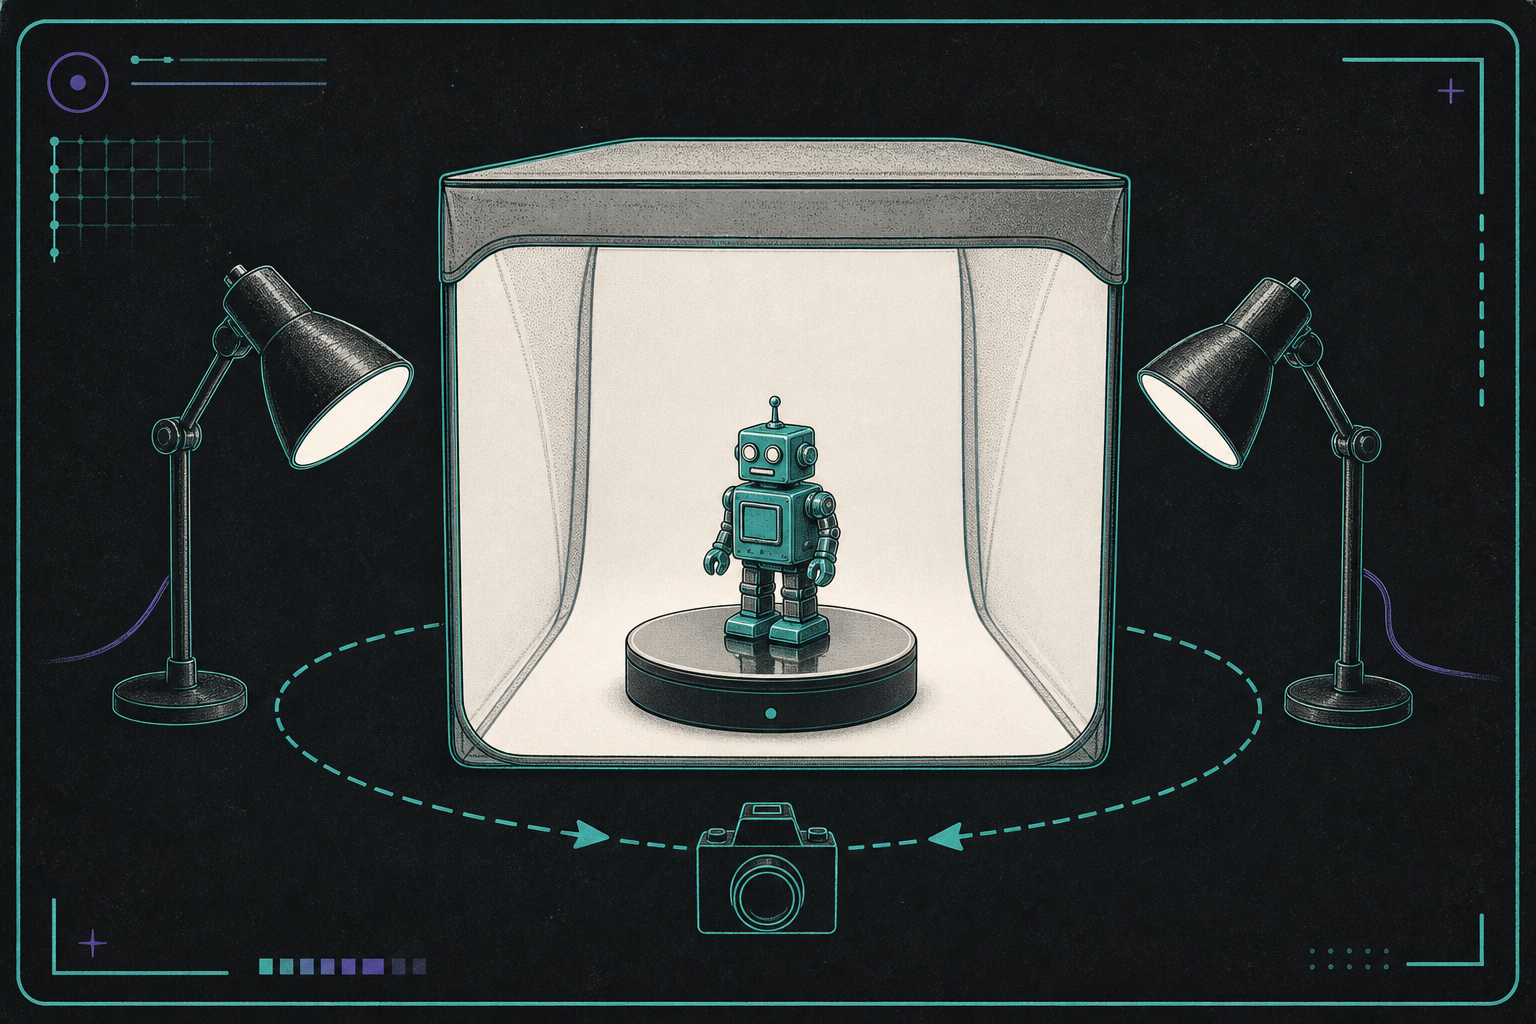
The image above is the setup I like mentally: the product sits still, the lamps stay symmetric, and the camera walks around the object instead of chasing contrast changes.
Two rules keep this part sane:
- Match the light on both sides as closely as you can.
- Remove anything reflective or busy that does not belong in the final product view.
If a product looks clean in the room but still seems risky, I go back to the surface checklist in How to Tell If a Shopify Product Will Scan Cleanly in 3D. That post is the faster filter for shiny, clear, or fuzzy items.
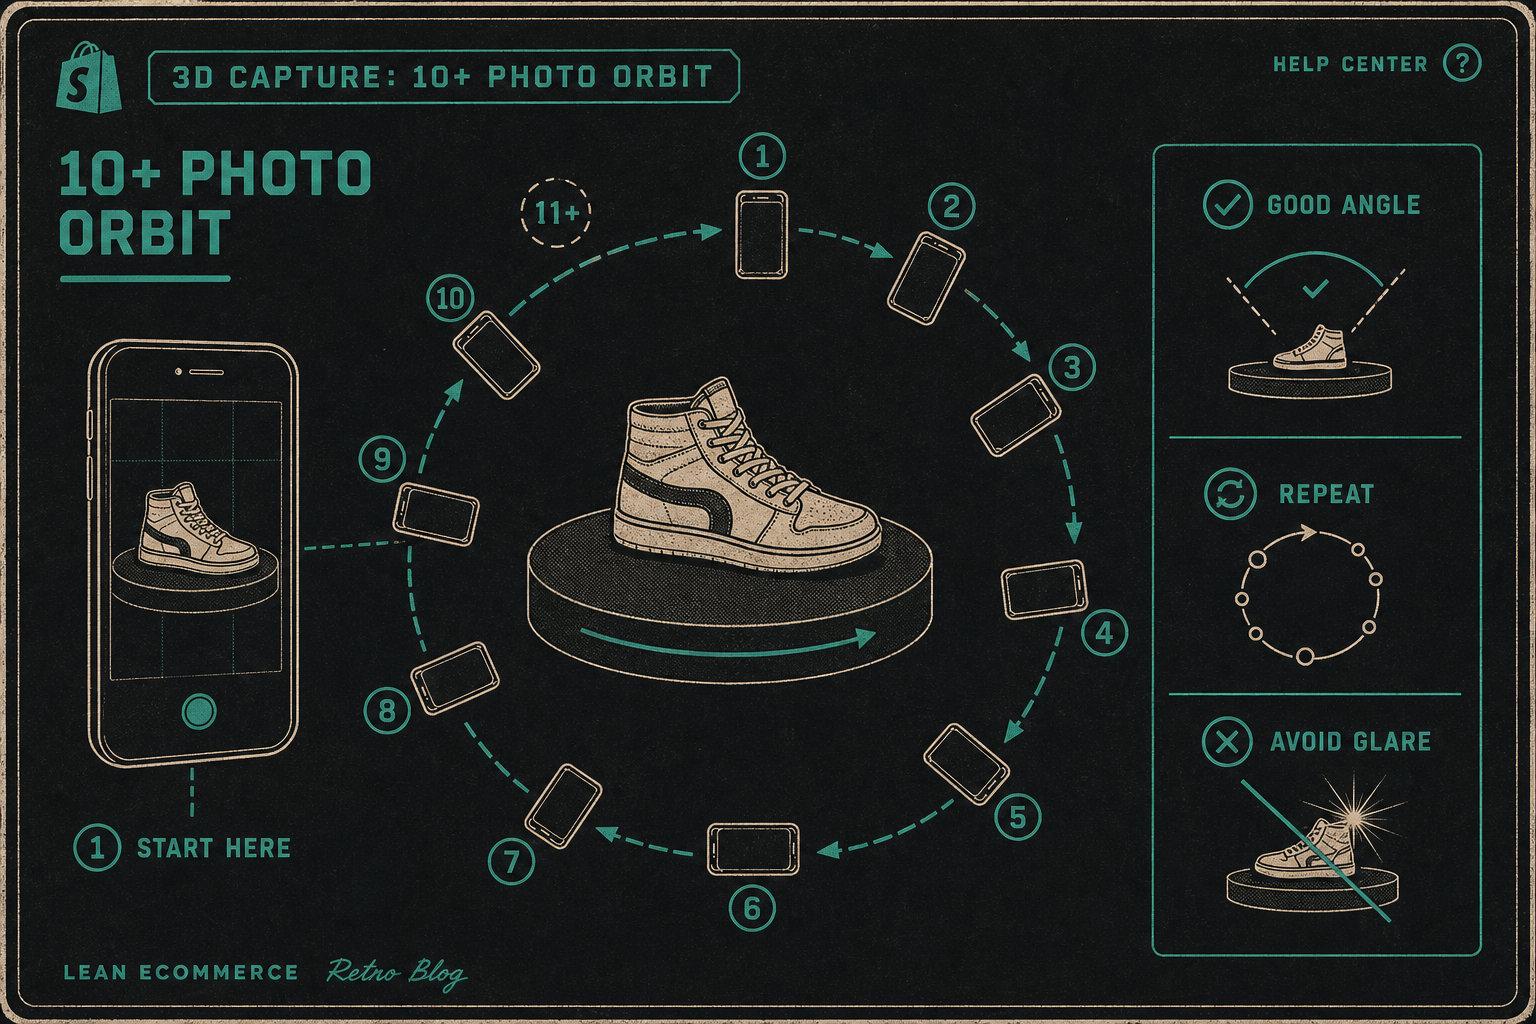
3. Treat The Orbit Like A Repeatable Path
The guided capture session works best when I stop improvising. I want the phone to move around the product at a steady height, a steady distance, and a steady pace. The exact number of frames matters less than the consistency of the path, but the app’s 10+ photo orbit is a good practical baseline.
This is where the capture session stops being “take a few photos” and becomes “follow a route.” I try to think in circles, not in moments:
- Keep the product centered.
- Stay close enough to preserve detail.
- Avoid big jumps in angle or height.
- Do not let the camera drift into the background.
If I want a cleaner shot plan before I begin, I use How to Build a Shopify 3D Capture Shot List as the reference. It is the closest thing to a pre-flight checklist I have found for this workflow.
4. Follow The Orbit, Then Inspect The Preview
This is the part people skip when they are rushing. I do not trust the first run until I inspect the preview and ask whether the model still feels like the original product.
When the orbit is working, you can usually see it in the output quickly:
- The product stays centered.
- Edges do not tear apart.
- The shape still looks like the real object.
- Reflections are not dominating the surface.
If the result looks muddy, I do not immediately reshoot more of the same. I go back and fix the reason the capture failed. That usually means lighting, orbit distance, or product selection.
If you want to see how I think about the final page as well, How I Build a Shopify Product Page Around a 3D Model is the right companion piece. A model only helps if the page gives it room to matter.
5. Publish The GLB Where Shopify Can Actually Use It
Once the model is clean enough, I want it attached to the product in a way that feels native. The point of Supra 3D Capture is not just to create a file. It is to make that file usable as Shopify product media, so the shopper can drag, rotate, and inspect it without leaving the product page.
That matters because the model should reduce uncertainty, not add another asset to babysit. A good 3D file gives customers a better feel for proportion, depth, and surface. It also makes the page feel more interactive without asking for a redesign.
The pricing is set up for that kind of incremental rollout too. There is a Free plan for one saved model and three scans per month, a Base plan at $14.99/month, and a Pro plan at $29.99/month. That makes it easy to test the workflow on one SKU before you commit to a bigger rollout.
If you want the exact product context, the Supra 3D Capture landing page and the Shopify App Store listing are the two places I would start.
6. Use The First Scan To Decide What To Do Next
I treat the first successful model as a diagnostic, not a trophy. If it looks good, I add a second similar SKU and keep the workflow moving. If it looks off, I fix the setup before I scan anything else.
That is why I like the more operational approach from How to Choose the First Shopify Products for 3D Capture: it keeps the work bounded and prevents me from turning one useful experiment into a catalog-wide headache.
Troubleshooting
If the scan is soft, go back to lighting and distance first.
If the scan is broken around the edges, check whether the orbit was too fast or too uneven.
If the scan looks wrong on the product page, confirm the model is actually attached to the Shopify media flow or the theme app block.
If the product is shiny, clear, fuzzy, or deeply reflective, do not force it into the first batch. Pick a cleaner SKU first and come back to the hard one later.
The Short Version
The best Shopify 3D captures are usually the ones that start with a deliberate setup. Pick a product that can be scanned, light it evenly, keep the orbit repeatable, inspect the preview, and only then publish it to Shopify.
If you want to test the workflow on one real product, start with Supra 3D Capture and the Shopify App Store listing. Then choose the easiest SKU in your catalog and see whether the page becomes easier to buy from.