When a video workflow gets messy, the problem is usually not the render itself. The problem is the handoff: one file for preview, another for editing, and a third for export.
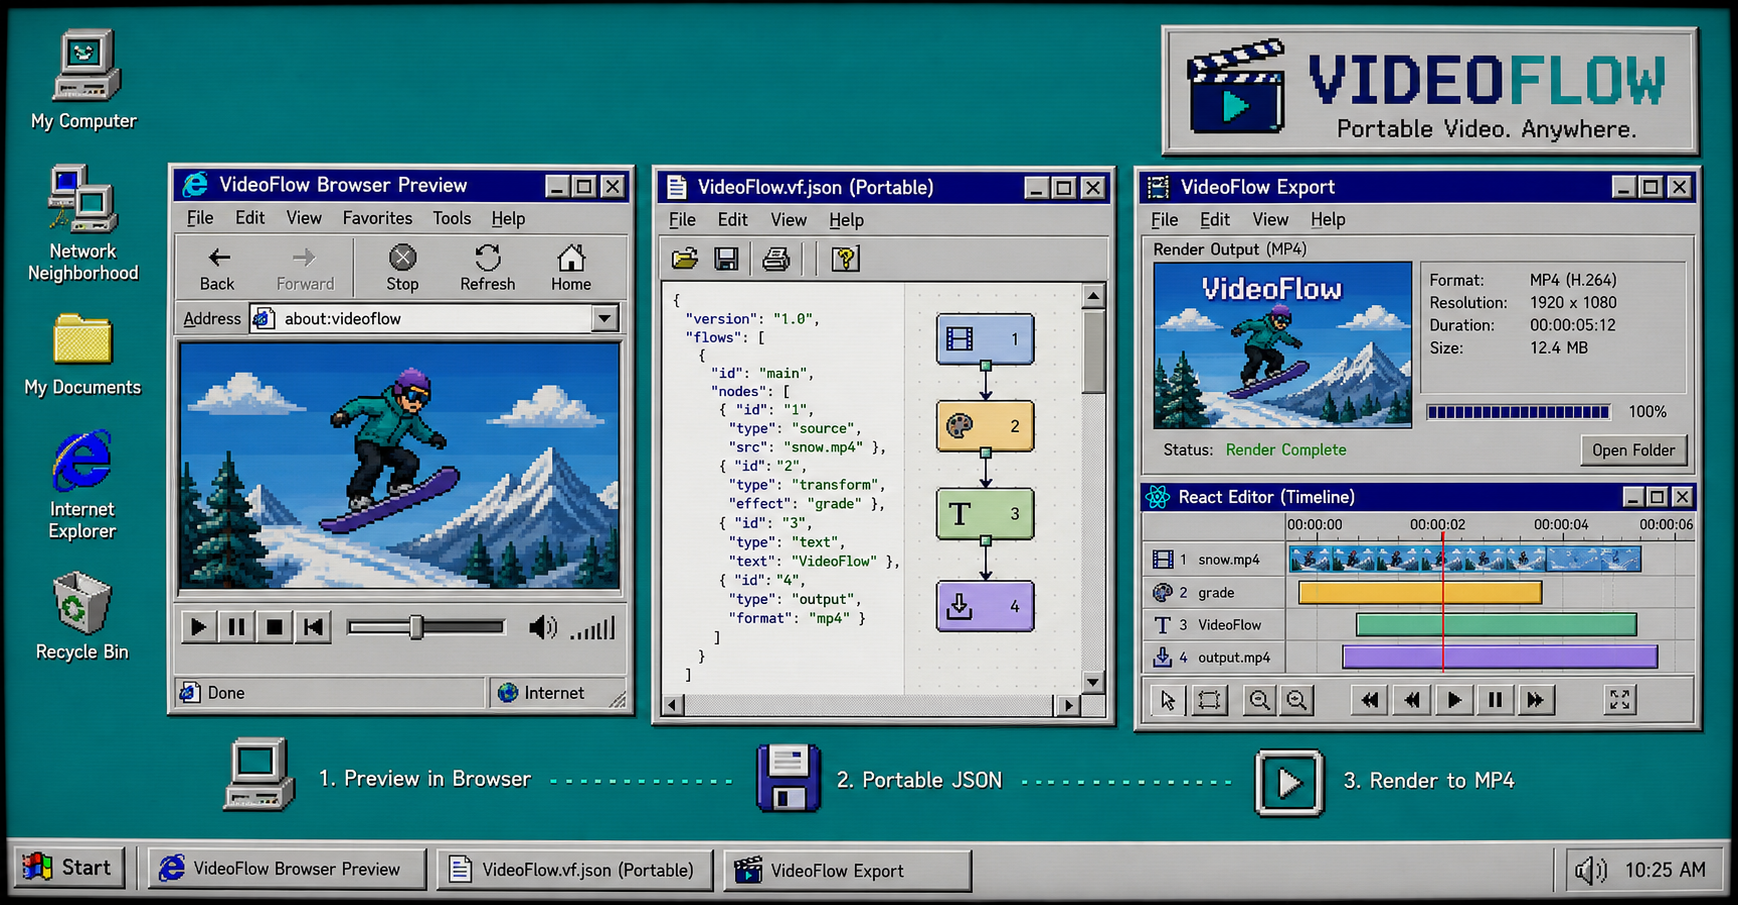
VideoFlow keeps that boundary clean by treating the video as portable JSON and rendering the same structure in the browser, on the server, or inside a React editor. If you want the toolkit, start with VideoFlow and keep these pages open: core, renderers, React video editor, playground, and GitHub.

If you are still deciding where the rendering boundary should live, How to Separate Video Data From Rendering With VideoFlow is the right companion piece. It explains the split between authoring data and turning that data into pixels.
What You Need
Before you start, make sure you have:
@videoflow/corefor authoring the scene@videoflow/renderer-browserfor browser-based MP4 export@videoflow/renderer-serverfor server-side rendering and batch jobs@videoflow/renderer-domfor live preview in the browser@videoflow/react-video-editorif you want a multi-track React editor in the app
That stack gives you a single JSON source of truth and three practical ways to use it.
1. Author The Scene Once
Start in @videoflow/core and write the video as code. The exact scene can be simple at first; the important part is that you end up with a portable artifact instead of a one-off editor project.
import VideoFlow from "@videoflow/core";

const $ = new VideoFlow({
  name: "My Video",
  width: 1920,
  height: 1080,
  fps: 30,
});

$.addText(
  { text: "Hello, VideoFlow!", fontSize: 7, fontWeight: 800 },
  { transitionIn: { transition: "overshootPop", duration: "500ms" } }
);

const json = await $.compile();
After this step, you should have a VideoJSON object that you can store, diff, or hand to another renderer without rewriting the scene.
If you want the broader mental model, How to Build a Portable Video Workflow Around VideoJSON covers the same idea from a slightly wider angle.
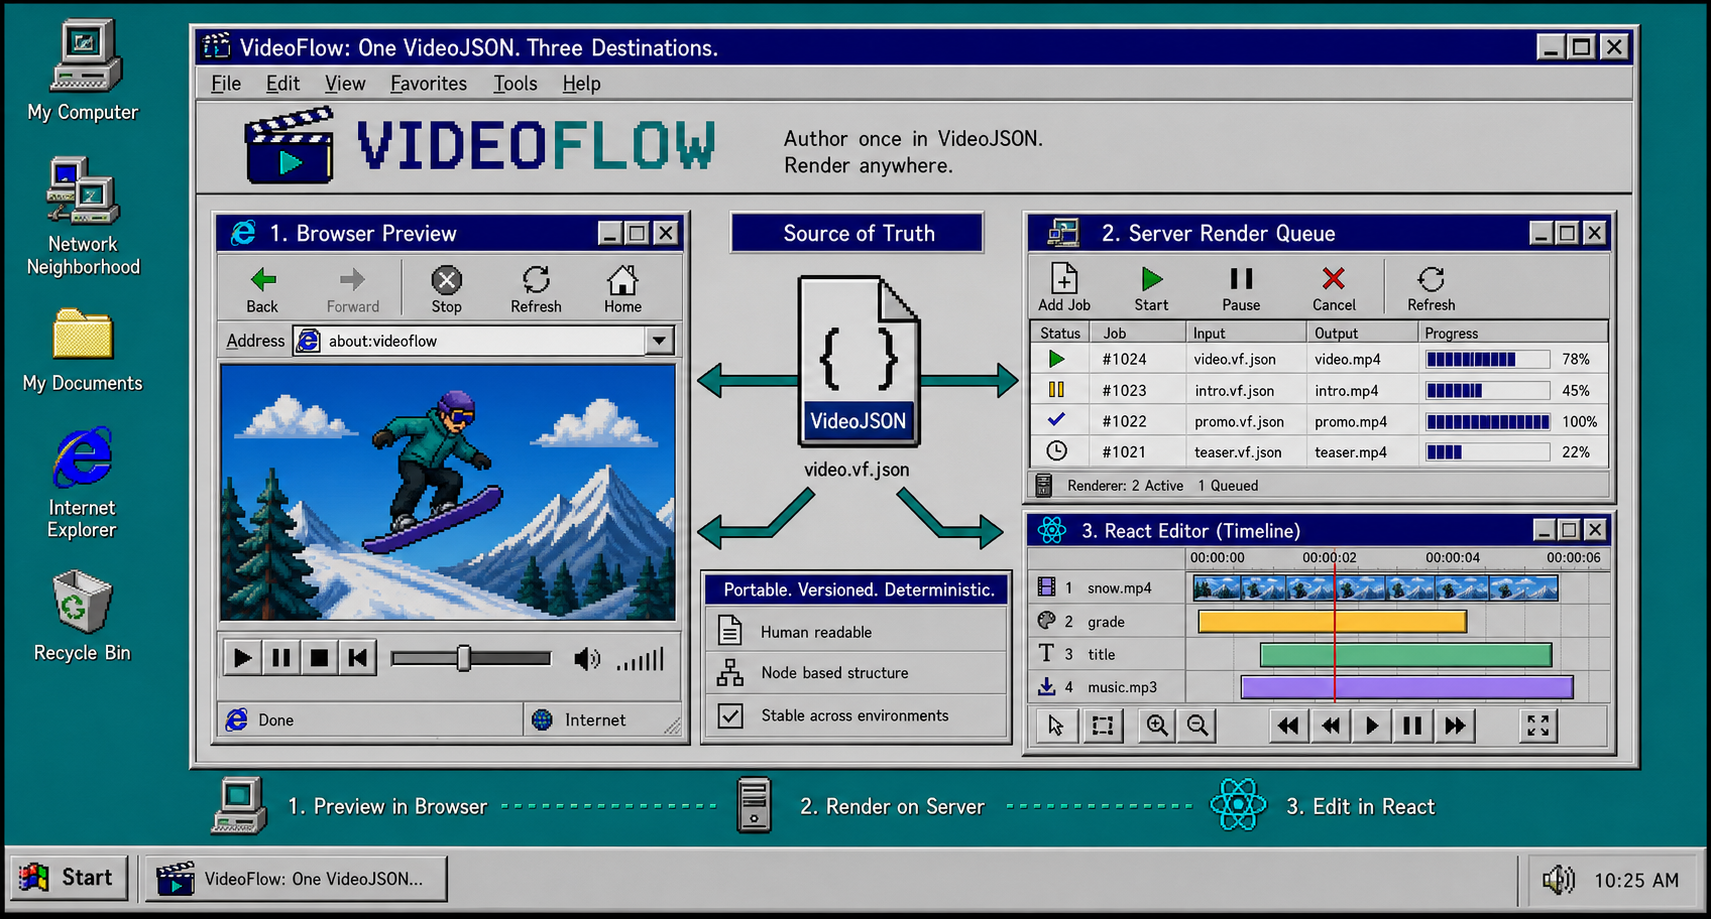
2. Preview It In The Browser
Use the browser renderer when you want quick feedback. It is the fastest way to catch layout bugs, timing mistakes, or assets that do not scale the way you expected.
The playground at videoflow.dev/playground is useful here because it lets you test a scene before you wire it into a larger app. If the scene looks wrong, fix it in the JSON first instead of trying to patch the MP4 afterward.
A good browser-preview checklist is simple:
- Confirm the canvas size matches the target export size
- Confirm each asset resolves from the same path you will use later
- Confirm transitions land on the right frame
- Confirm text still reads cleanly at the final resolution
That same preview-first habit is what makes How I Keep One Video JSON Working Across Three Renderers practical instead of theoretical.
3. Open The Same Project In The React Editor
When a teammate needs a visual editor instead of code, embed the React video editor and keep the same JSON under the hood.
import { VideoEditor } from "@videoflow/react-video-editor";
import "@videoflow/react-video-editor/style.css";

export default function App() {
  return (
    <VideoEditor
      video={videoJSON}
      onChange={(next) => saveToServer(next)}
      onSave={async (next) => await persist(next)}
      onUpload={async (file) => await upload(file)}
      theme="dark"
    />
  );
}
That editor gives you a multi-track timeline, keyframes, undo/redo, an inspector, and theme options. In practice, that means a designer or operator can make safe edits without owning the render pipeline itself.
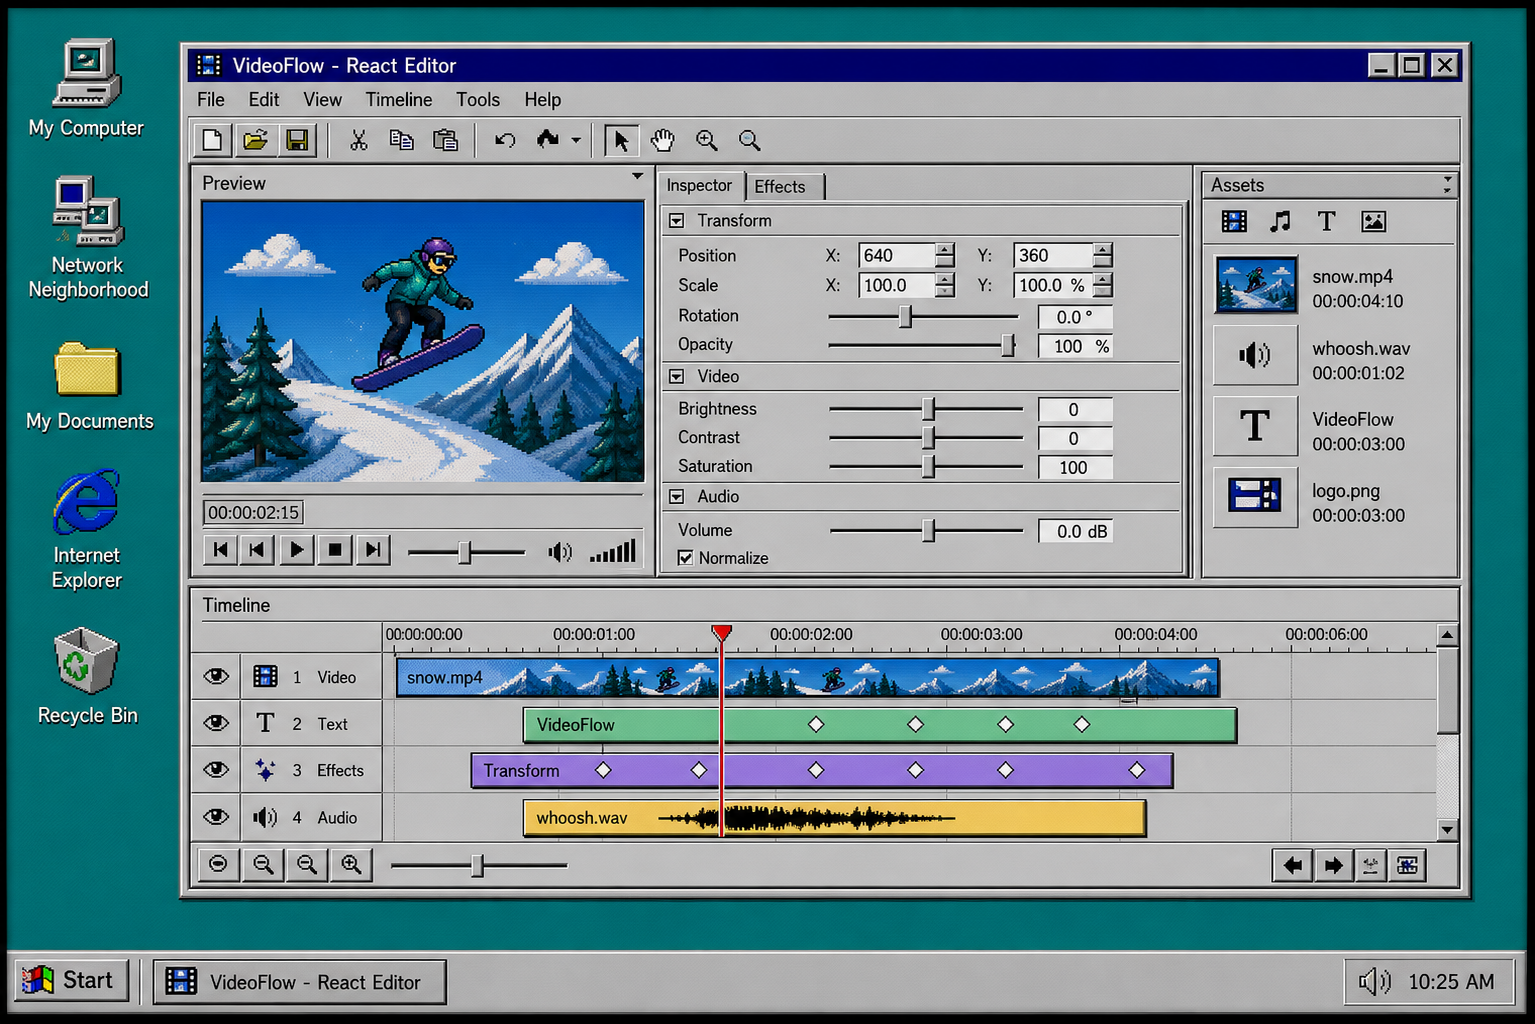
If you are embedding video tools into a product, How to Add a React Video Editor Without Rewriting Your Video Pipeline shows the integration path in more detail.
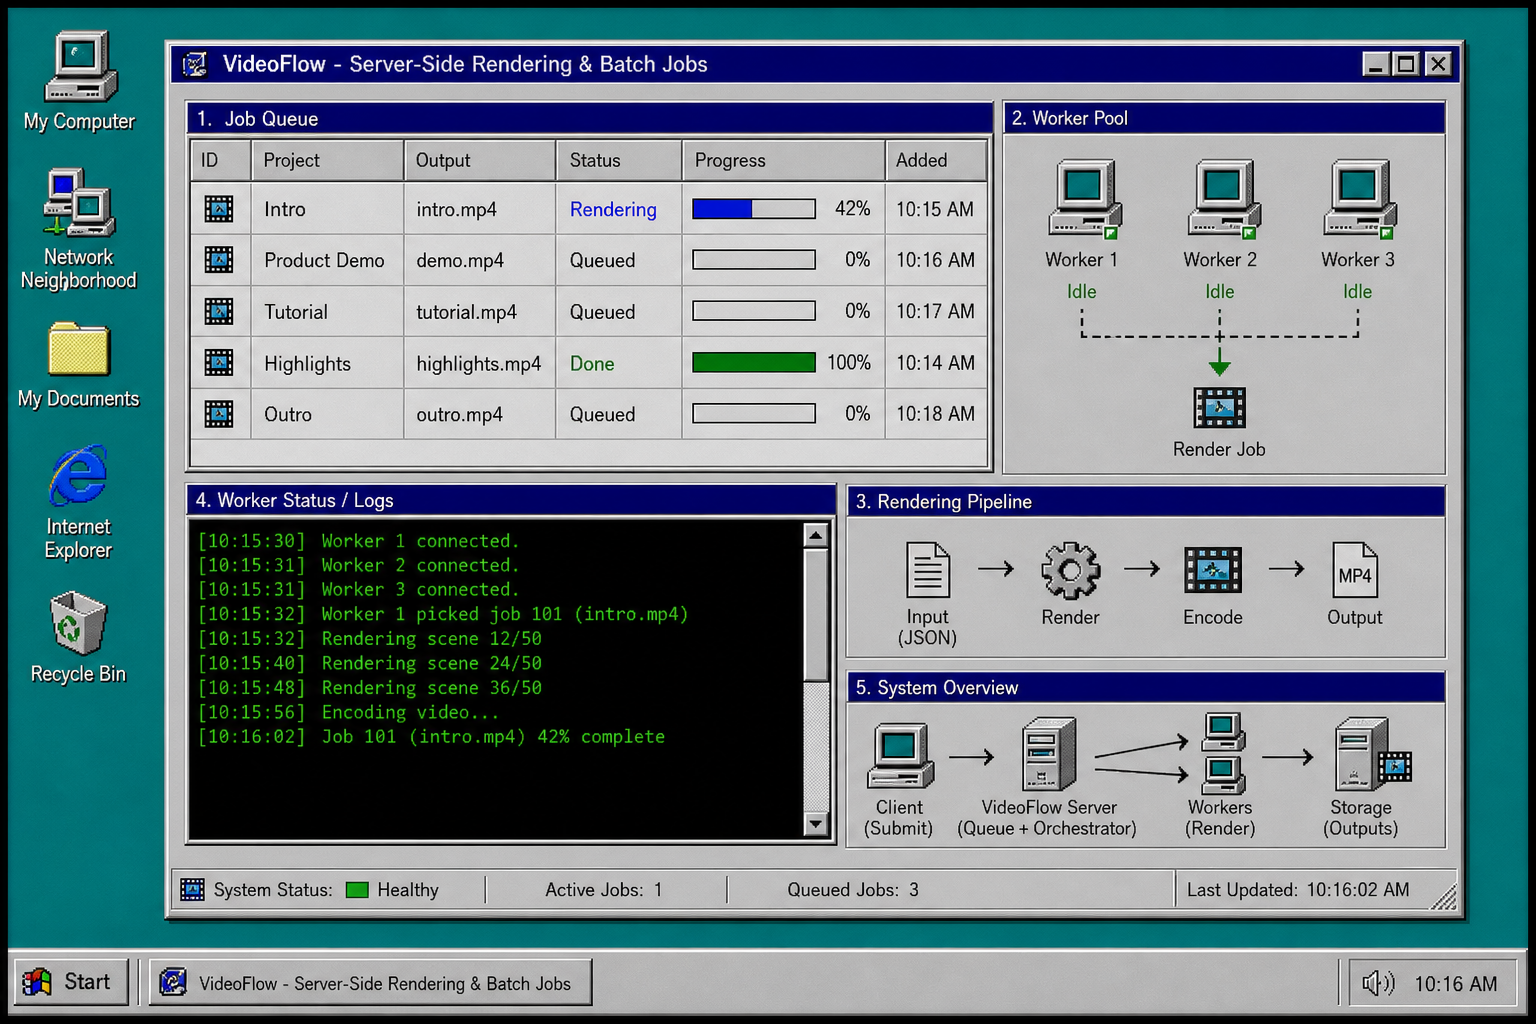
4. Export MP4 Where It Makes Sense
Use the browser renderer for user-triggered exports and the server renderer for batch jobs, queues, or scheduled jobs. That split keeps the app responsive without giving up control when volume goes up.
A good rule of thumb:
- Browser export: one-off exports, low ops, and user-driven previews
- Server export: many jobs, long scenes, or anything that belongs in a queue
- DOM preview: live scrubbing and frame-accurate playback inside the app
VideoFlow is useful because the same JSON can move between those targets without a rewrite. The open-source core stays Apache-2.0, and the renderers stay focused on the job they are best at.
5. Keep The JSON Portable
This is the part that makes the workflow durable. If the scene survives browser preview, React editing, and server-side rendering, then your video logic is no longer tied to one UI or one runtime.
That is the same reason the other VideoFlow posts cluster around portability and renderer boundaries: How to Build a JSON-First Video Workflow With VideoFlow, How to Separate Video Data From Rendering With VideoFlow, and How I Keep One Video JSON Working Across Three Renderers.
If you are choosing what to ship first, start with the browser preview and the core builder. Add the React editor only when someone needs to edit visually, and add the server renderer only when you need batch throughput or scheduled exports.
Troubleshooting
If browser export feels slow, move the export step to the server renderer and keep the browser for preview only.
If the preview and final MP4 do not match, check that both renderers are using the same asset URLs, dimensions, and timing values.
If the editor drifts from the code source, keep the JSON as the saved record and treat the UI as a view over that record.
If you need a lighter integration, keep @videoflow/core and @videoflow/renderer-dom first, then add browser export later.
Next Step
Start with one scene in @videoflow/core, preview it in the browser, and export it from the same JSON before you add any extra layers of abstraction.
If you want to go deeper, the docs and the examples are the fastest places to start.